Author Archives: Jie Wang

Home Data Backup & Redundancy Practices

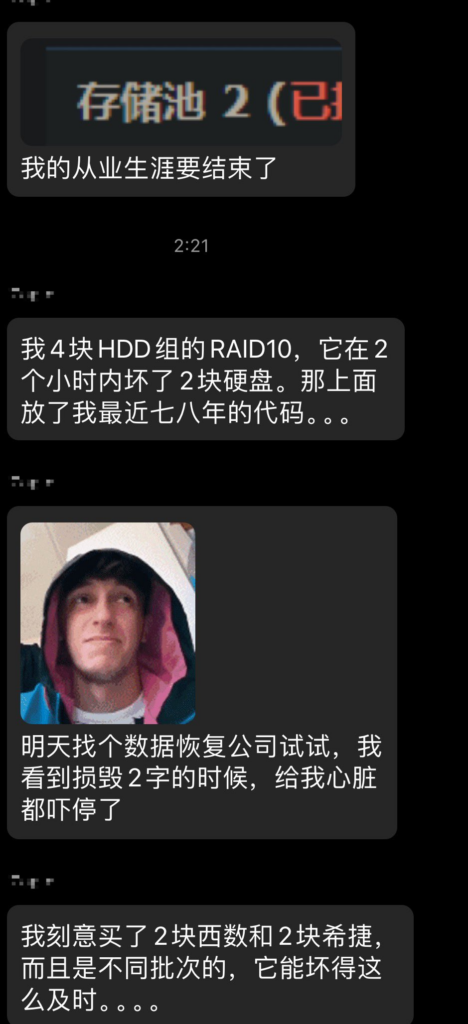
My desire to draft this post was inspired by a recent pic from X, former Twitter.

Storage Pool 2 (Damaged)

My career is over.

I set up RAID 10 for four HHD disks, but two of them became faulty within two hours. They have persisted my code for the past seven or eight years.

Tomorrow, I am going to try some enterprise-level data recovery services. When I saw DAMAGED, my heart stopped.

I bought two WD disks and two Seagate disks from different batches on purpose, but they still crashed simultaneously.

I am using this chance to note down my practices of home data backup and redundancy against what I balance with privacy.

Let me start with this pic above. As a long-term user of NAS, I also encountered a situation where two disks were faulty nearly at the same time. At that moment, I just started to use NAS, so my dependency on NAS was pretty weak. Once I found one of the disks got down, I directly shut NAS down and ordered a new disk. Less than half an hour after I replaced the faulty disk with the newly procured one, another disk got down as well. So, if I had not shut the NAS down previously, I would have faced data loss.

As my dependency on the NAS got stronger, I found that it was tough for me to shut the NAS down when there was a faulty disk. Not to mention that the delivery in Singapore is much slower than in China, and waiting for one week for a new disk is not rare, so I was thinking of how to reduce the concurrence of two faulty disks without shutting the NAS down.

When one disk gets down, besides shutting the NAS down, lowering the disk IO, etc, reducing the concurrence of the failure of the second disk is not an easy thing. So, from my perspective, it is more realistic to reduce the failure duration of the first disk by setting up a standby disk.

How to Reduce the Risk of Double Faulty Disks for NAS: Standby Disk

The NAS I always use is 4-bay, but I only use three of the four disks to create a storage pool with Synology Hybrid RAID (SHR) enabled. The fourth disk is a standby disk instead of part of the storage pool.

  1. When a faulty disk is found in the storage pool, I will immediately replace it with the standby disk and remove it from the NAS.
  2. I will order a new disk. After I receive it, I will install it in the NAS as a standby disk. This will maximize the reduction of the failure duration of the first disk.
  3. But if another disk fails when the newly procured disk is on the way, I will still shut the NAS down as well.
//www.plantuml.com/plantuml/png/XPAnRi8m48PtFyNLKnaoaD2jYXWgf2uKbR5qCFWAKHrRSfoYgEgxrnIHvCAbC5d_7VQNxsvU1UL3NHfn5mvO8gXZbJYlx1w5C6gB1kJI-L8PASI7Lx53haDis2Eid3CmbV0j07RAQv1FHVKP4q63T1XaKlm8qGjciB7tww2itZOJsJwSd7zvbxnOX8MgJMZWz4T9RfcURbcemg3Us5SitHVgoHWsHEuX9ro1NYKpYEmKa18kyMWQM7ctgptgFqfujj6oYLYKzs7mrJmd2ygGCgXdLd4P83mcRuT2QxJlITuRrkN4rTEsdhBrhArdR9rEbcN9oQ2xCsbX9Z-CcFV7T-A_Aki1EX70cu1E1OouuAcf2Qg2SN5xnsuqK3P-5xcKzz8NCsQchsRCJUoPezLrQNu1
Reduce the failure duration of the first disk by using standby disk

If something happens often enough, it will be inevitable regardless of its low probability.

Anything that can go wrong will go wrong.

Murphy’s Law

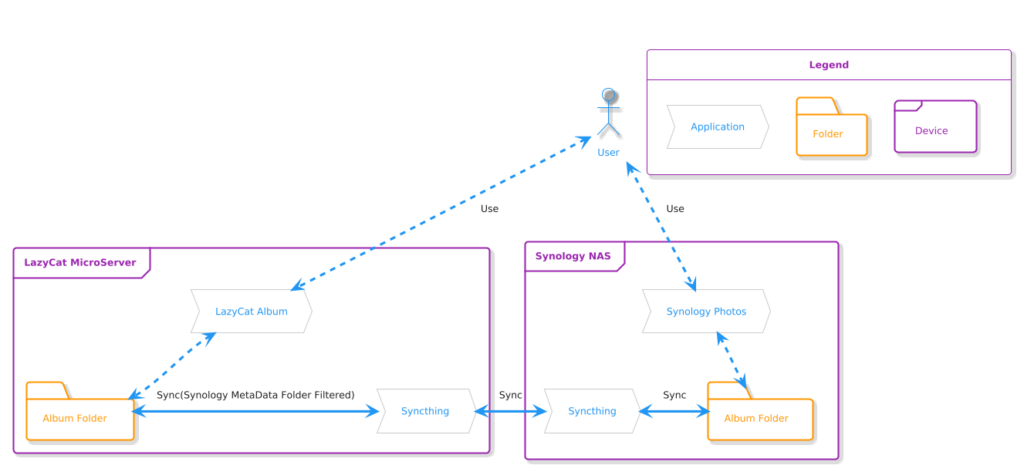
Obviously, putting eggs into one basket, NAS, is not reliable; after all, RAID is not data backup but data redundancy. As I mentioned in my previous post, Unconventional Usage of LazyCat MicroServer, I still rely on LazyCat MicroServer to backup some important data, such as photos, as shown in the following figure:

https://www.plantuml.com/plantuml/png/TPBFRl8m4CJlVehzSlfw80-08WGguWHL9THJrSFMNeWb_q6R3HAj-kvjY5M3eQSecTdVPCUUTu8ilNVgdxJa2JmAiSL9xCNPG0grH8QNZbYf7QCdgDRuSNf4WOtL7BV4H-8AFXN0WQEchikEXNllVNMfR4z1Isl37eRFk-WCCLHd7wpIc_fAKMTxT75_WgV5zZeZIyzjbDZTJ_ahv9oXaGsiQK_1NA4NXuEp6iN6aCV7EGKm_jcIZbRJG1cgWMRosbfZABpD4b5TKA2fivn0u-DAISmiPQreGgdSOpEP5Rl1T51LqUfep7F9zlyNl2719Gf2cbXP9yHa7igm6qRge3RrxFPSOFgZNZYAsv7qOeEcxk-nYfsIhoIgEGNJU_SD
Dual Usage of Synology Photos & LazyCat Photo App

In fact, for such important data as photos, this is still far from enough. After all, the NAS and LazyCat MicroServer are both at home and strictly speaking, this does not count as off-site disaster recovery. So, I also use cloud storage to build an accepted version of 3 data centers in 2 locations 😂.

Accepted Version of “3DC in 2LOC”

I did a bit of simple thinking before confirming the implementation plan:

  1. Family photos, in my opinion, are extremely private data, so I have always hesitated to store them in cloud storage. Considering the limitation of local storage regarding data security, I had to compromise and accept uploading encrypted photos to the cloud. Ultimately, I preferred Syncthing because it supports encrypting the data before syncing.
  2. Cloud storage should offer high guarantees regarding privacy protection, compatibility, and stability, so I ultimately chose Google Drive.

Thus, the plan was confirmed.

//www.plantuml.com/plantuml/png/XP3DQiCm48JlUegfxdg1K4nA-dFfJy77qeEGDhP0Fs4j1zpITo_6IXEd3Zb9OaRVpkowovfp7xouoIq5Gj2Ps6cL-knT926sh0D1FkklOQCpNfpXL1FlYIM-1R3ZPAZh8EiXcjows40AO9ky9OPyBAVuEQ16O_Af6V1wLrzY_4US4juYuNrpSVuim4CqFEmoMPGeKnRZKsyXdr9gFE6UtPwa4CirRzL7wwob-Acgi_XNVrH_QKKfCgeLZcbNu_KWOb9FbraCitvGrMApuZrQhy8AQmPV5VBudEnBevIgplUtfcZxu7y1
Accepted Version of “3DC in 2LOC”

Of course, it is impossible to protect all the data with this implementation. Also, from the perspective of data backup itself, it’s impossible to achieve comprehensive coverage, and cost control also needs to be considered. Please skip the next section for guys who do not care about cost. 😂

Data Classification

Before proceeding with data backup and redundancy, it is necessary to classify the data first.

I classified all the data into four levels:

  • Level 1: Data should remain regardless of the existence of me
  • Level 2: Data should remain when I exist
  • Level 3: Better not lose the data
  • Level 4: Not important

Additionally, I also classified the data into another three levels based on the privacy requirements:

  • Level 1: Absolute privacy
  • Level 2: Not suitable to disclose in the public domain
  • Level 3: Can be displayed in the public domain

Based on the classification above, a simple scheme matrix has been drafted.

Persistence LevelPrivacy LevelExamplePlanMisc
Level 1Level 1Private projects and related dataNAS + LazyCat + Google Drive (Encoded)Accepted version of “3DC in 2LOC”
Level 2Non-private contracts, documents, etc.NAS + LazyCat + Google Drive
Level 3NA
Level 2Level 1NA
Level 2Non-private contracts, documents, etc.GitHub Private Repo + Google DriveDual cloud
Level 3Open-source projects and related dataGitHub Public Repo + Google DriveDual cloud
Level 3Level 1Purchased digital mediaNAS + LazyCat– Dual local storage
– Privacy due to copyright
Level 2NA
Level 3NA
Level 4Level 1Insignificant documents and data scattering across various devicesNA
Level 2Insignificant documents and data scattering across various devices and clouds
Level 3Insignificant documents and data scattering across various devices and clouds
Data Classification

The dual-cloud solution mentioned in the table above is too common to be elaborated on. The NAS + LazyCat solution is actually the same as the one mentioned in the post, Unconventional Usage of LazyCat MicroServer. That’s all for now.

Unconventional Usage of LazyCat MicroServer

Recently, I got a new niche product, LazyCat MicroServer. First, I would like to thank LazyCat CEO Andy Stewart for the coupon provided, as I am a loyal user of the OpenAI Translator created by yetone. 😂

LazyCat MicroServer

Like some other guys, when I saw the introduction to LazyCat MicroServer for the first time, I thought, “Isn’t it just a NAS?” I already own a NAS, and after playing around with it for a while, I realized that it looks like a NAS, but it falls short of a NAS in terms of data and service stability. However, it far surpasses NAS in terms of performance and flexibility. LazyCat MicroServer and NAS are entirely different products in separate lanes.

LazyCat MicroServer ≠ NAS

Here is why I think LazyCat MicroServer falls short of a NAS regarding data and service stability.

  1. NAS natively supports RAID. LazyCat MicroServer does have two data disks equipped but is not RAID-supported. Although the real-time Btrfs backups via external drives could be a decent compromised solution for users without a NAS, as someone who already owns a NAS, I will definitely not migrate the significant data to LazyCat MicroServer.
  2. NAS mainly has dual network interface cards (NIC) that support a variety of configurations, and I usually use NIC bonding to ensure one network port failure is tolerated for uninterrupted communication. However, most NAS devices do not natively support WiFi, but LazyCat MicroServe does, so the wired connection + WiFi combination is an acceptable compromise.

Considering these, I will not replace my NAS with LazyCat MicroServer. Of course, this is also not its market positioning.

LazyCat MicroServer > NAS Data and Service Stability Requirements Excluded

LazyCat MicroServer has some that attract me:

  1. Its performance is way better than most traditional NASes, and the equivalent high-performance NASes are way more expensive. Due to my NAS’ limited performance, I have to hold some deployments. But now I can deploy them on LazyCat Server and migrate most of the applications from NAS to LazyCat MicroServer. My NAS will be more of a data backup tool and media center.
  2. The LazyCat AppStore is well-stocked, and the LazyCat MicroServer features configuration-free network tunneling. Its cross-platform SDK has quite an active community.
  3. LazyCat’s official apps have some features that Synology’s counterparts are incapable of. For example, leveraging its more powerful chipset and LLMs, the LazyCat Photo app supports natural language photo queries. The upcoming version will also support duplicate photo detection and cleanup. Synology Photos, in contrast, is lack of this functionality despite its predecessor, Moments, having it. The community has requested Synology to reinstate this feature for quite a long while, but no official response has been received. Moreover, Synology doesn’t offer an API for Synology Photos, making third-party solutions impossible. Before LazyCat, I had to rely on third-party tools to periodically scan my NAS for duplicate photo cleanup, which was very troublesome.

Unconventional Usage

In order to experience the exciting features of LazyCat official Apps without migrating significant data like photos to LazyCat MicroServer, I figured out an unconventional usage by using Syncthing.

Dual Usage of Synology Photos & LazyCat Photo App

First of all, I need to confirm whether this dual usage is feasible.

  • I confirmed that the LazyCat Photo App supports both direct uploads from clients and files copied to its “Photos” directory.
  • Syncthing supports folder filtering, which means we can exclude some unnecessary files or folders from syncing.

Next, I am going to set up based on the diagram below. 😂

https://www.plantuml.com/plantuml/png/TPBFRl8m4CJlVehzSlfw80-08WGguWHL9THJrSFMNeWb_q6R3HAj-kvjY5M3eQSecTdVPCUUTu8ilNVgdxJa2JmAiSL9xCNPG0grH8QNZbYf7QCdgDRuSNf4WOtL7BV4H-8AFXN0WQEchikEXNllVNMfR4z1Isl37eRFk-WCCLHd7wpIc_fAKMTxT75_WgV5zZeZIyzjbDZTJ_ahv9oXaGsiQK_1NA4NXuEp6iN6aCV7EGKm_jcIZbRJG1cgWMRosbfZABpD4b5TKA2fivn0u-DAISmiPQreGgdSOpEP5Rl1T51LqUfep7F9zlyNl2719Gf2cbXP9yHa7igm6qRge3RrxFPSOFgZNZYAsv7qOeEcxk-nYfsIhoIgEGNJU_SD
Dual Usage of Synology Photos & LazyCat Photo App
  1. I installed Syncthing on both my NAS and LazyCat MicroServer. The photo folder on my NAS syncs with a subfolder of the photo folder on LazyCat MicroServer. Additionally, I configured Syncthing to ignore Synology metadata directories, @eaDir, on my NAS side.
  2. I use Synology Photos’ mobile backup while keeping LazyCat’s backup disabled to avoid duplicate uploads.

In this way, I can manage my photos with the LazyCat MicroServer’s high performance while relying on my NAS to securely store cherished memories; All the changes made on either side sync to the other.

To Be Continued

I’m still exploring new ways to use the LazyCat MicroServer. For instance, I recently deployed a lightweight RAG (Retrieval-Augmented Generation) solution using AnythingLLM integrated with Ollama, and it was onboarded at LazyCat AppStore.

Admittedly, LazyCat MicroServer is not without any flaws: its SDK documentation is cryptic and incomplete, and the system, SDK, and website are riddled with bugs. The support team feels amateurish. The whole process of porting and developing applications on the MicroServer feels like pioneering uncharted territory. Despite its shortcomings, LazyCat’s rapid iteration, timely patches, and exceptionally quick support response give a strong impression of a product on the rise.

As the company’s first product of this kind, I have realistic expectations. Ironically, these imperfections make the process feel like an adventure, and I’m excited to keep exploring the MicroServer’s potential. Ironically, it’s the imperfections that make this journey engaging. The challenges add a layer of excitement, pushing me to dig deeper and explore more of the MicroServer’s potential. I’m eager to continue this adventure and uncover new possibilities.

The Surprise Brought by ChromeOS

I had been trying to seek an ideal portable device that could be used to draft posts, watch videos, and code. I tried to use my Macbook for this, but it was too heavy for portable use.

I considered several solutions, but all were canceled by myself, for example:

  • GDP Win: I don’t have any interest in Windows. Furthermore, the keyboard is too small. Calluses must be at my fingertips if I use this to draft posts and code. Besides these, the price is not ideal either 🥹
  • DevTerm: Linux, 1 point gotten. But the screen is too small for long-time use. It seems the battery life is also not good enough.
  • PinePhone: This Linux phone equipped with its official keyboard kit is similar to DevTerm. It could be flashed to an Android phone if it was not good enough. According to the announcement of Pine, the product is not mature enough and is aimed at Linux developers with extensive knowledge of embedded systems and experience with mobile Linux. That is to say that we may face many unknown and unpredictable issues. I don’t refuse to troubleshoot, but don’t want to do that for my daily portable devices.

When I was lost in the options, one word popped into my mind: ChromeOS. Before, my understanding of ChromeOS was just its Chrome-based mechanism, which meant we could only access web pages and run web applications on it. And its lightweight also brings high cost-effectiveness. After a thorough go-through on this, I found its functionality and usability were both significantly improved. So I finally decided to get one. Actually, I will not share the functionalities and features of ChromeOS and Chromebook because Google’s official sites introduce these better. Instead, I will share more about the surprise I experienced during my initial experience of ChromeOS.

Deep Integration of Three Operation Systems

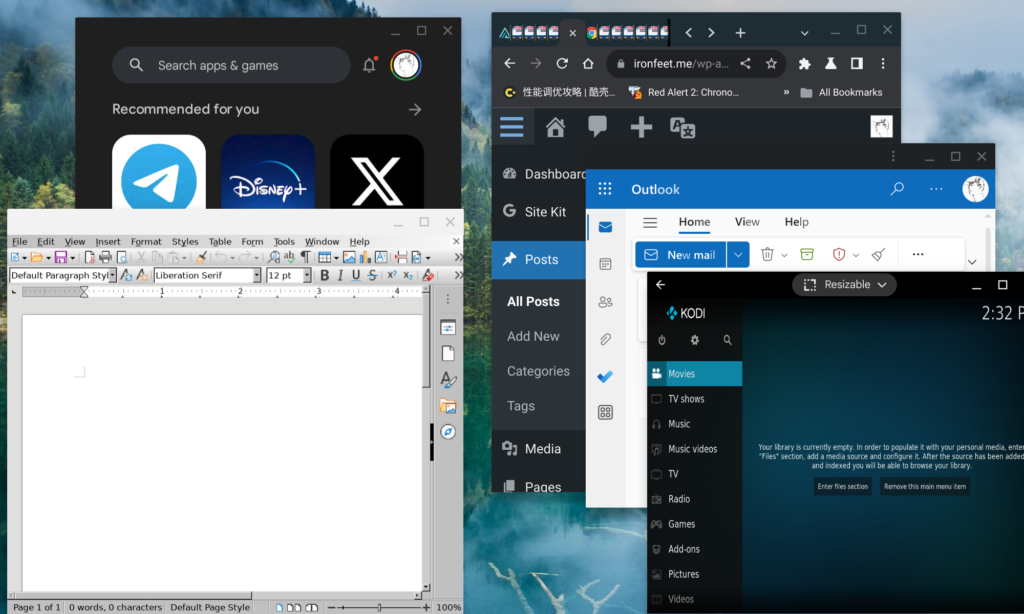
Currently, Chrome not only supports web pages, web Apps, and PWAs, which are Progressive Web Apps, but also supports Android Apps and Linux Apps. And it is not simply running an Android simulator and a Debian simulator on ChromeOS. Overall, the experience is similar to the Coherence Mode of Parallels Desktop. We can run Chrome browser, web Apps, PWAs, Android Apps, and Linux Apps as native Apps simultaneously without managing three separate desktops of three OSs or rebooting.

As the screenshot above shows, we can see Google Play running in the upper left corner and Kodi in the bottom right corner, both Android Apps. We can also see LibreOffice running in the bottom left corner. In the upper right corner and the middle of the left side, we can see ChromeOS built-in Chrome browser and the PWA of Outlook. Except for the UI differences caused by the system toolkits of three operation systems and permission differences caused by the sandboxes, there are no other significant differences when switching across different types of Apps.

Android App Streaming

If the phone paired to a Chromebook is running Android 13 or above, the Apps running on the phone can be streamed to ChromeOS. This streaming of Android App is not casting but as a native App running on the Chromebook like the screenshot above. Actually, the running App is not installed on this Chromebook.

Global Extension Support

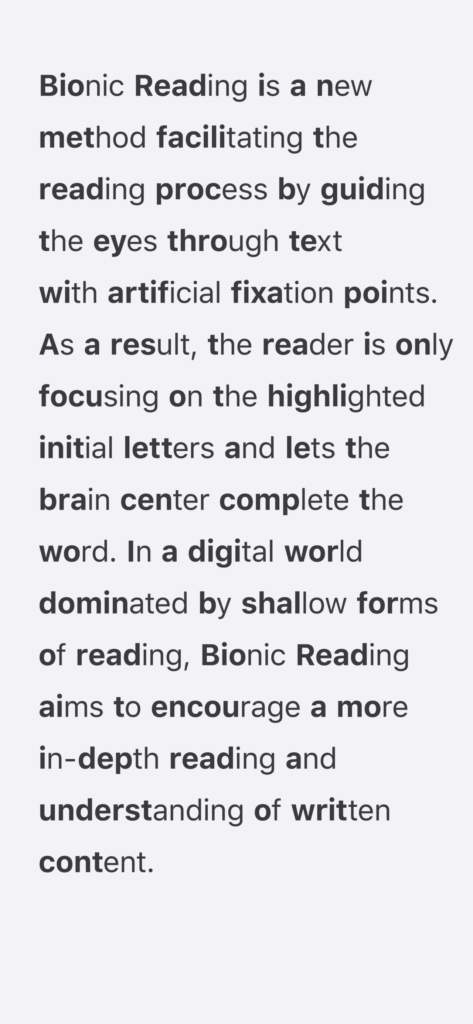
I keep trying to improve my English, including English reading. Recently, I have found a way of reading called Bionic Reading, and it can enhance reading effectiveness.

So, I started to use Jiffy Reader, an extension to automatically show the chosen web pages in the Bionic Reading mode. I hope there will be a tool that globally shows as much content in the Bionic Reading mode as possible on the macOS level, but obviously, it is nearly impossible.

But, on ChromeOS, most Apps are web pages, web Apps, and PWAs; However, Android Apps and Linux Apps only form a tiny part. The former part of Apps are all running on top of Chrome; therefore, in a nutshell, nearly all the Chrome extensions work for this part, including Jiffy Reader. I enable the Bionic Reading mode for Outlook, so we can find the bold letters in the Outlook Home, View, and Help menu items shown on the ChromeOS desktop screenshot above.

In this case, we can use our favorite extensions outside web browsers now 😂

Seamless Mode Switch

ChromeOS supports tablet mode and laptop mode. The tablet mode is called Touch UI Layout, similar to an Android tablet or Android phone; certainly, laptop mode is like a laptop. There is a configuration that makes Chromebook automatically switch between laptop mode and tablet mode seamlessly based on whether it connects to a mouse or a touchpad.

As shown above, I bought a detachable Chromebook. Whenever I attach or detach the covered keyboard, the Chromebook can switch back and forth seamlessly. It is pretty convenient.

That is all. I will keep digging and will share more surprises that I meet. 😁

One Script That Can Annotate The Chinese Characters on Web Pages with Pinyin

Days ago, I found a very interesting userscript on Appinn.com. All Chinese characters on web pages can be annotated with Pinyin by enabling this userscript on web-browser such as Chrome, Firefox, etc.

Actually, anyone that understands Pinyin will be able to pronounce any Chinese characters annotated with Pinyin.

Hanyu Pinyin (simplified Chinese: 汉语拼音; traditional Chinese: 漢語拼音; pinyin: hànyǔ pīnyīn), often shortened to just pinyin, is the foremost romanization system for Standard Mandarin Chinese. It is used in either a formal, educational or official capacity in countries where the language is official, which are the People’s Republic of China (PRC), the Republic of China (ROC, Taiwan) and Singapore, as well as in the United Nations (UN). It is principally used to teach Mandarin, normally written with Chinese characters, to learners already familiar with the Latin alphabet. The system includes four diacritics denoting tones, but pinyin without tone marks is used to spell Chinese names and words in languages written in the Latin script, and is also used in certain computer input methods to enter Chinese characters and in some Chinese dictionaries to arrange entries. The word Hànyǔ (simplified Chinese: 汉语; traditional Chinese: 漢語) literally means “Hanlanguage” (i.e. Chinese language), while Pīnyīn (拼音) means “spelled sounds”.[1]

https://en.wikipedia.org/wiki/Pinyin

Since several of my foreign colleagues are learning Chinese and Mandarin, I think it will not be a bad idea to share with them this userscript. But it is not easy for them to use this userscript because not only the README file but the menu and comments of this userscript are also written in Chinese. So I am drafting this post to introduce how to use this.

To enable a userscript, we have to install a browser extension to run userscripts on websites; quite a few ways of installing them are listed here.

This script is hosted with GreasyFork. We can install it after we install one of the extensions above and restart the browser to take effect.

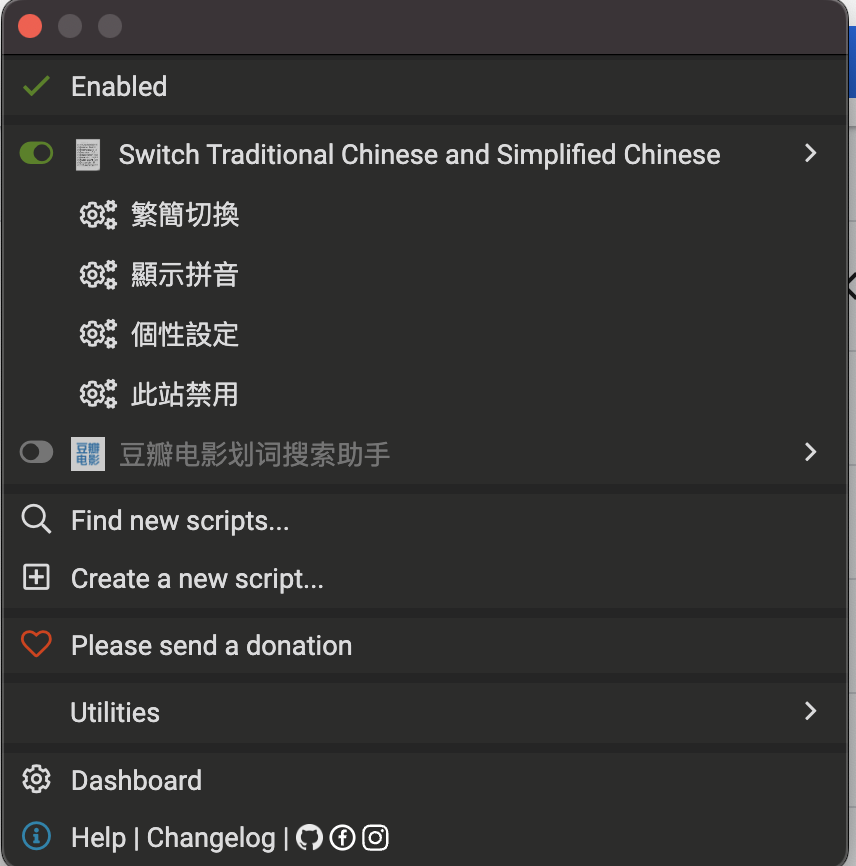
If the extension we installed was Tampermonkey, we could see this menu after clicking the extension icon of Tampermonkey.

But the menu is definitely not user-friendly to Chinese learners. Only the title is in English, but all the menu items are still in Chinese, not to mention this is not in Simplified Chinese but Traditional Chinese, which is harder for Chinese learners.

Let me explain the four items one by one.

  • 繁簡切換: This item helps you to switch the Chinese character between Simplified Chinese and Traditional Chinese. If you cannot figure out which one is Simplified Chinese, remember that mainly the version of Chinese with fewer strokes is Simplified Chinese.
  • 顯示拼音: This item is the most significant one for Mandarin learners. This item can annotate all the Chinese characters with Pinyin as below.
  • 個性設定: We can ignore this one.
  • 此站禁用: If the automatic switch between Simplified Chinese and Traditional Chinese is enabled with one of the submenus of the above item, we can turn off the switch for the domain of the currently active web page.

Here is a brief introduction to this script. Hope this script can help some Chinese and Mandarin learners.

How to Deploy An All-in-One Instant Messaging Service

WeChat could connect me to nearly all my friends and relatives in China. But now, I have to install several IMs to ensure that I can connect to all of my new friends because of the different countries they are staying in, their different kinds of concerns, and their different habits of using instant messaging services (IM). Besides WeChat, I have WhatsApp, Telegram, Signal, Line, Google Chat, and Linkedin on my phone. Although Telegram is my favorite, I have to switch between these IMs, and this really gives me a headache.

There are definitely several all-in-one IMs, but they are not ideal enough because they are all implemented in the ways below.

  1. Integrated all the browser versions of the IMs with HTML frame tags. It is alright on a Laptop, but facing these terrible UIs, that only suit big screens, on phones is a nightmare.
  2. Unpacked all the traffics of the browser versions of the IMs and packed them again into prettier and higher-integrated UI. Frankly speaking, I was worried about the potential data security issues, which would destroy the privacy protection guaranteed by these IMs’ end-to-end encryption (E2EE).

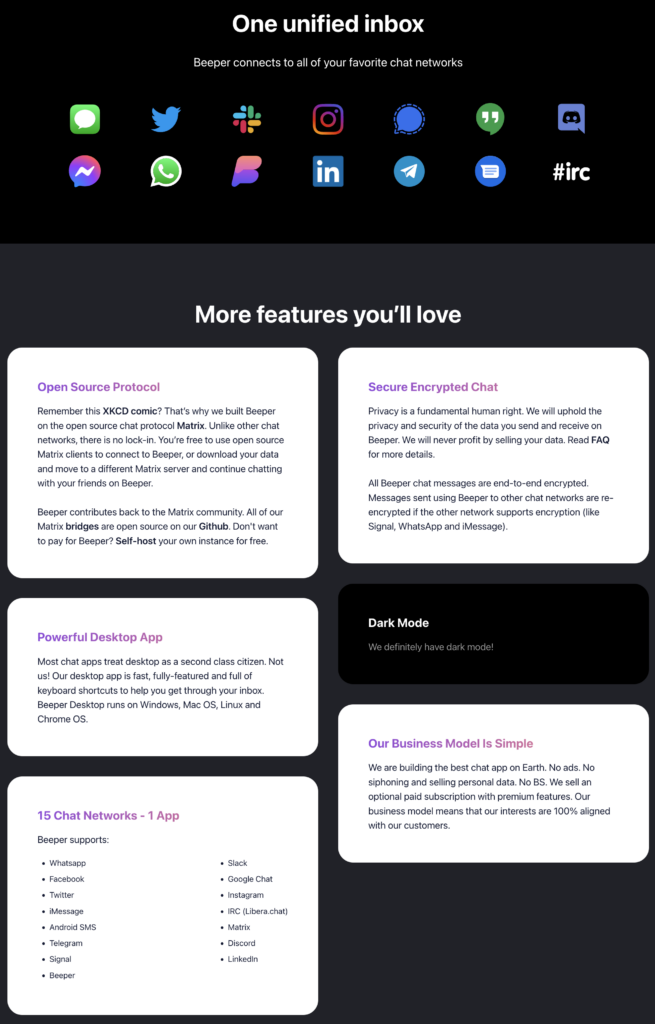
However, I heard about a service called Beeper that really gave me some hope.

According to the official introduction, this service really meets all my imagination about an all-in-one IM. So I signed it up, but was defeated by the reality.

After several months, more than 100000 guys are still waiting before me, which is really hopeless. Then I noticed that Beeper is built based on Matrix, so why don’t I deploy this by myself?

After going through a little, I was totally impressed by Matrix:

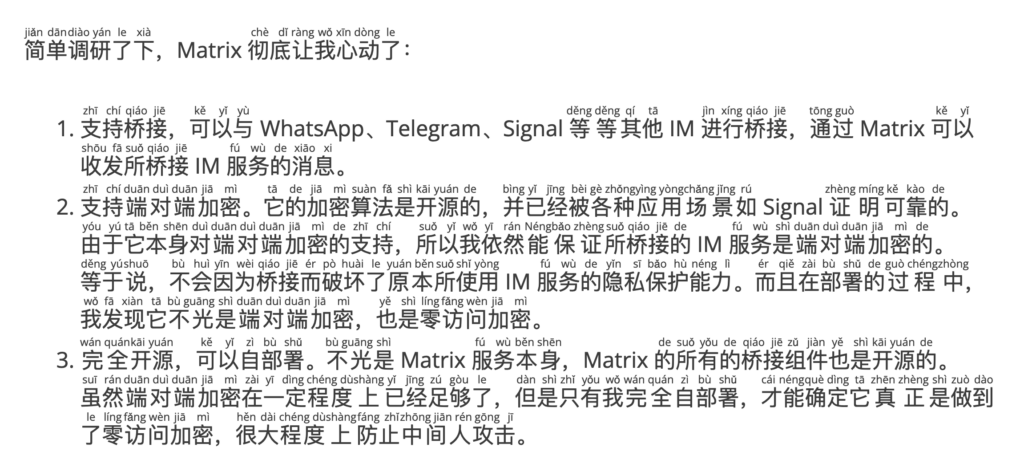
  1. Supports bridging. Matrix can exchange data and messages with other IMs such as WhatsApp, Telegram, Signal, etc.
  2. Supports E2EE. The E2EE algorithm is open-source and verified by many application scenarios, such as Signal.
  3. Open-source. Matrix is open-source and supports self-host. Not only Matrix itself but all the bridging services are also open-source. Although E2EE is relatively enough, if self-host is possible, zero-access encryption can be totally ensured, and man-in-the-middle attacks can be relatively blocked.

Let’s roll!

Deploy Matrix Service

There are at least 6 open-source implementations of Matrix, and I finally prefer using Synapse because this is the only server of Matrix implemented by the Matrix core team.

Welcome to the documentation repository for Synapse, a Matrix homeserver implementation developed by the matrix.org core team.

Introduction to Synapse @ https://github.com/matrix-org/synapse

I decided to deploy with Docker, as mentioned in the official documentation, to make it easy to maintain. I can say that the official documentation is pretty good, but we still need to face several issues before successfully deploying it.

Before deploying, we need to confirm the domain name of Matrix first. Let’s assume it is homeserver.mymatrixhost.com. Now we can start deploying, and I don’t think I need to introduce how to install Docker here.

Configuration of Matrix

Firstly, a configuration file needs to be generated with the following command:

docker run -it --rm \
    --mount type=volume,src=synapse-data,dst=/data \
    -e SYNAPSE_SERVER_NAME=homeserver.mymatrixhost.com \
    -e SYNAPSE_REPORT_STATS=no \
    matrixdotorg/synapse:latest generateCode language: Bash (bash)
  • SYNAPSE_SERVER_NAME (Mandatory): the domain name the service uses. It should be homeserver.mymatrixhost.com, as we assumed.
  • SYNAPSE_REPORT_STATS (Mandatory): Whether to report anonymous statics. I choose no.
  • /data: the default folder of Synapse’s configuration. As per the command above, it is /data.

Suppose we set synapse-data as the folder of the data source and the Docker is running under the default configuration. In that case, we will see a file named homeserver.yaml in the folder of /var/lib/docker/volumes/synapse-data/_data after executing this command. This is the configuration file of the Matrix service as below.

# Configuration file for Synapse.
#
# This is a YAML file: see [1] for a quick introduction. Note in particular
# that *indentation is important*: all the elements of a list or dictionary
# should have the same indentation.
#
# [1] https://docs.ansible.com/ansible/latest/reference_appendices/YAMLSyntax.html
#
# For more information on how to configure Synapse, including a complete accounting of
# each option, go to docs/usage/configuration/config_documentation.md or
# https://matrix-org.github.io/synapse/latest/usage/configuration/config_documentation.html
server_name: "homeserver.mymatrixhost.com"
pid_file: /data/homeserver.pid
listeners:
  - port: 8008
    tls: false
    type: http
    x_forwarded: true
    resources:
      - names: [client, federation]
        compress: false
database:
  name: sqlite3
  args:
    database: /data/homeserver.db
log_config: "/data/homeserver.mymatrixhost.com.log.config"
media_store_path: /data/media_store
registration_shared_secret: "bzxSPVVwhHMiSs6b6YRBKreN-i^W^2tCUmS^4r~Hr:_ew,Alkb"
report_stats: false
macaroon_secret_key: "J1kYVZ~+fixo*RI@K5,~W-LoL#lMr0ZVJg.nFN,=MT_bYpk@JJ"
form_secret: "2zXL_q~hI1nF^m#yBumaIvY9dFU~j9uiFO0bGR5Rgc-U5gf6@2"
signing_key_path: "/data/homeserver.mymatrixhost.com.signing.key"
trusted_key_servers:
  - server_name: "matrix.org"

# vim:ft=yamlCode language: YAML (yaml)

Most of the items can be set as default. But I will still explain several important items.

Listener

listeners:
  - port: 8008
    tls: false
    type: httpCode language: YAML (yaml)

if HTTPS needs to be enabled, tls should be set to true. But I don’t recommend it because:

  1. It is relatively troublesome to configure certificates directly for applications in containers.
  2. It is easier to test our service if it serves with HTTP.
  3. There are a few solutions that provide service externally with HTTPS and also retain HTTP. For example, with the help of a reverse proxy, as mentioned in the official documentation. This is also the solution I prefer. Regarding to the possible security issue caused by HTTP, we can block all the inbound traffic to Port 8008 with a firewall and test the HTTP service locally through Port 8008.

Database

database:
  name: sqlite3
  args:
    database: /data/homeserver.dbCode language: YAML (yaml)

Synapse supports PostgreSQL and SQLite, and I prefer SQLite for easier deployment because this Matrix service is only for self-use. And because we set the default /data as the configuration folder, the path of the configuration file is /data/homeserver.db.

Next,

Run Matrix

Besides the Synapse, we also need to run the bridging components, which will run in separated containers. So it is essential to set up the network bridge before we run the Matrix so that the services can find each other at the domain name that is the same as its container name.

docker network create synapse-netCode language: Bash (bash)

It is time to run Matrix now.

docker run -d --name synapse \
    --mount type=volume,src=synapse-data,dst=/data \
    -p 8008:8008 \
    --net synapse-net \
    matrixdotorg/synapse:latestCode language: Bash (bash)

As above, we name the Matrix’s container with –name synapse, so that we can operate this container by claiming the name instead of the container ID. We also link the container to the network bridge synapse-net with –net synapse-net so that the services in other containers can contact this at the domain name that is synapse.

docker logs --tail 100 synapseCode language: Bash (bash)

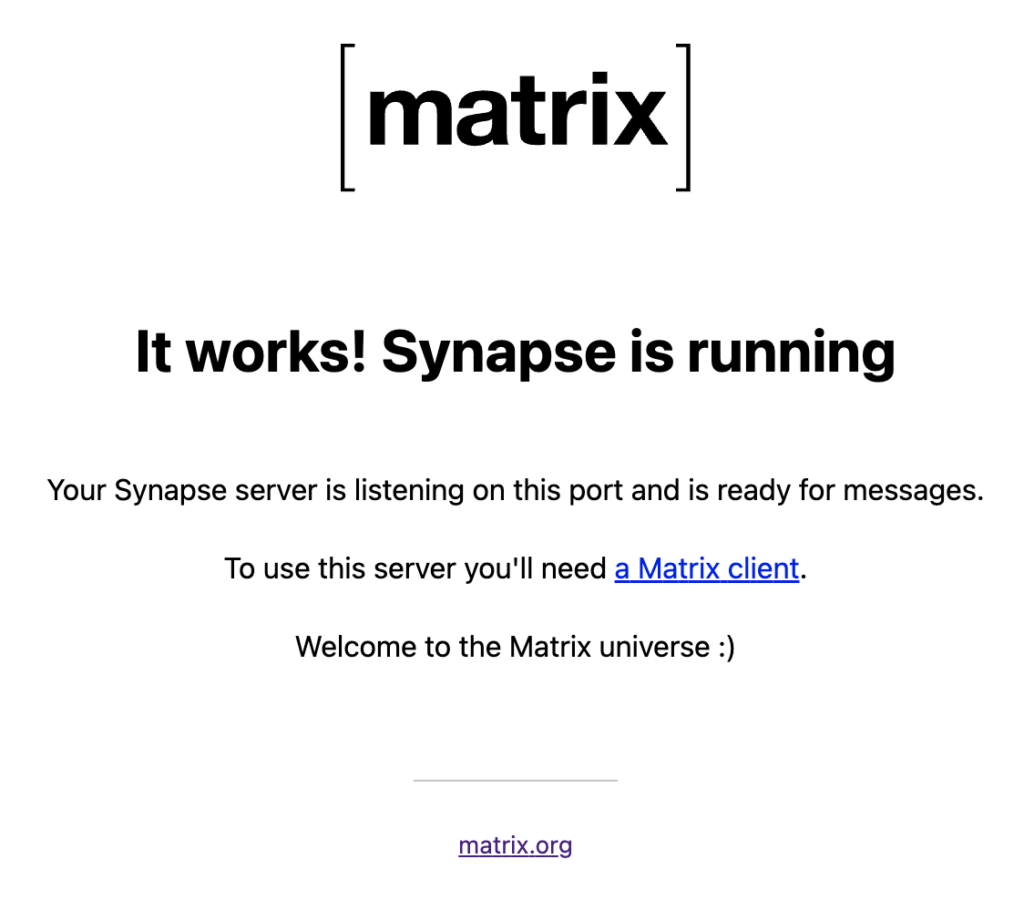
With the command above, we can go through the latest 100 lines of logs to check the status of the service. Because it is for self-use, we have not made any complicated changes to the configuration; it is pretty easy to make Matrix run. Before blocking all the inbound traffic to Port 8008 with a firewall, we can access http://{IP_of_Host_You_Deploy_the_Service}/_matrix/static/ to check Matrix. If good, it will show as below.

We can also use this command docker network inspect synpase-net to check the network status of the containers linking to the network bridge synapse-net.

Enable HTTPS: Reverse Proxy

I am unfamiliar with Apache2, but I simplified the deployment using DigitalOcean‘s 1-Click LAMP Droplet. In this case, I used Apache2 to set up the reverse proxy. And now, I am using Apache2 to introduce the reverse proxy setup.

Firstly, we must add the configuration below to /etc/apache2/sites-available/000-default-le-ssl.conf.

<VirtualHost *:443>
    ServerName homeserver.mymatrixhost.com

    RequestHeader set "X-Forwarded-Proto" expr=%{REQUEST_SCHEME}
    AllowEncodedSlashes NoDecode

    ProxyPreserveHost on
    ProxyPass /_matrix http://127.0.0.1:8008/_matrix nocanon
    ProxyPassReverse /_matrix http://127.0.0.1:8008/_matrix
    ProxyPass /_synapse/client http://127.0.0.1:8008/_synapse/client nocanon
    ProxyPassReverse /_synapse/client http://127.0.0.1:8008/_synapse/client

    ErrorLog ${APACHE_LOG_DIR}/error-matrix-server.log
    CustomLog ${APACHE_LOG_DIR}/access-matrix-server.log combined

    Include /etc/letsencrypt/options-ssl-apache.conf
    SSLCertificateFile /etc/letsencrypt/live/homeserver.mymatrixhost.com/fullchain.pem
    SSLCertificateKeyFile /etc/letsencrypt/live/homeserver.mymatrixhost.com/privkey.pem
</VirtualHost>Code language: Apache (apache)

Before making the configuration above take effect, we must enable all the necessary Apache modules with the command below.

a2enmod headers
a2enmod proxy
a2enmod proxy_httpCode language: Bash (bash)

Actually, I really met a weird issue when setting up the reverse proxy. If I restarted the Apache2 service without enabling the headers or proxy modules, Apache2 failed to start and threw an error telling me I should enable the specific module. But Apache2 succeeded in starting without enabling the proxy_http module. However, when accessing the service through the port of the reverse proxy, the error below would be thrown.

AH01144: No protocol handler was valid for the URL /_matrix/static (scheme 'http'). If you are using a DSO version of mod_proxy, make sure the proxy submodules are included in the configuration using LoadModule.Code language: JavaScript (javascript)

The mod_proxy mentioned in the error message really confused me until I found a comment of an answer with many thumb-ups on StackOverflow. It made me know that I also needed to enable the proxy_http module besides the proxy modules.

I am not familiar with Apache2. If anyone knows why the error message is so weird, Kindly explain, please.

Next, we must obtain an SSL certificate and bind a domain name. Please let me skip introducing this part here. Once done, we can access https://homeserver.mymatrixhost.com/_matrix/static/. If everything is good, we can get the page below again.

Now there is one last step to get Matrix ready for production: blocking the inbound traffic to Port 8008 for insecure HTTP access.

Verify with a Client

Since HTTPS is available, we can officially start to use the Matrix service now. Two more steps must be done before we use it: Administrator account and client.

Create an Administrator Account

With the command below, we can create an administrator account.

docker exec -it synapse register_new_matrix_user http://localhost:8008 -c /data/homeserver.yaml -aCode language: Bash (bash)

Please remember the -a parameter. If not, the account created will not be an administrator account.

Connect to Matrix with a Client

Matrix is open source, so we can find many Matrix clients on this page. After I tried Element and FluffyChat, I preferred FluffyChat.

Now we can try logging in. When logging in, do ensure to update the server from Matrix.org to homeserver.mymatrixhost.com, the Matrix service we deployed, and key in the username and password of the administrator account we created in the previous step.

Theoretically, our client will successfully help us log in the Matrix service.

Now we can start with the most exciting part. Let’s make Matrix an all-in-one E2EE IM.

Deploy the Bridges

Let’s start with WhatsApp and Telegram, the most popular IMs first. Similar to the deployment of Synapse, I also deployed the bridges with Docker, as the official documentation mentioned.

Deploy the Bridge to WhatsApp

WhatsApp Configuration

Firstly, we must execute mkdir mautrix-whatsapp && cd mautrix-whatsapp to create a folder to put the configuration files in. Then use docker run --rm -v `pwd`:/data:z dock.mau.dev/mautrix/whatsapp:latest to generate the configuration. After that, we will see config.yaml in the mautrix-whatsapp folder.

We can use default values for most items, so here I will only introduce several items that need altered values.

homeserver:
    # The address that this appservice can use to connect to the homeserver.
    address: http://synapse:8008
    # The domain of the homeserver (also known as server_name, used for MXIDs, etc).
    domain: homeserver.mymatrixhost.com

    # What software is the homeserver running?
    # Standard Matrix homeservers like Synapse, Dendrite and Conduit should just use "standard" here.
    software: standard
    # The URL to push real-time bridge status to.
    # If set, the bridge will make POST requests to this URL whenever a user's whatsapp connection state changes.
    # The bridge will use the appservice as_token to authorize requests.
    status_endpoint: null
    # Endpoint for reporting per-message status.
    message_send_checkpoint_endpoint: null
    # Does the homeserver support https://github.com/matrix-org/matrix-spec-proposals/pull/2246?
    async_media: false

# Application service host/registration related details.
# Changing these values requires regeneration of the registration.
appservice:
    # The address that the homeserver can use to connect to this appservice.
    address: http://mautrix-whatsapp:29318Code language: YAML (yaml)

Not sure whether you still remember that we created a network bridge called synapsenet that lets containers use the container name as the domain name to contact each other.

The address item of the homeserver above is to claim the Synapse service we deployed. All the containers are running on the same host, and the bridge to WhatsApp can access through Port 8008 to access the insecure service of HTTP, so we set the address to http://synapse:8008. Besides, the address of appservice should be set to http://mautrix-whatsapp:29318, and the domain should be set to homeserver.mymatrixhost.com.

    # Database config.
    database:
        # The database type. "sqlite3-fk-wal" and "postgres" are supported.
        type: sqlite3-fk-wal
        # The database URI.
        #   SQLite: A raw file path is supported, but `file:<path>?_txlock=immediate` is recommended.
        #           https://github.com/mattn/go-sqlite3#connection-string
        #   Postgres: Connection string. For example, postgres://user:password@host/database?sslmode=disable
        #             To connect via Unix socket, use something like postgres:///dbname?host=/var/run/postgresql
        uri: file:///data/db.db?_txlock=immediateCode language: YAML (yaml)

Although this bridge also supports PostgreSQL, I still prefer SQLite for self-host and easy maintenance. If encountering the error regarding to failed DB initiation when starting this bridge, executing touch db.db to create an empty DB file can solve this.

    # End-to-bridge encryption support options.
    #
    # See https://docs.mau.fi/bridges/general/end-to-bridge-encryption.html for more info.
    encryption:
        # Allow encryption, work in group chat rooms with e2ee enabled
        allow: true
        # Default to encryption, force-enable encryption in all portals the bridge creates
        # This will cause the bridge bot to be in private chats for the encryption to work properly.
        default: trueCode language: YAML (yaml)
  • allow (Mandatory): Set this to true so that all the sessions bridged by this service can be E2EE enabled.
  • default (Mandatory): Set this to true so that all the sessions bridged by this service will be E2EE enabled by default.
permissions:
    "*": relay
    "homeserver.mymatrixhost.com": user
    "@matrixadmin:homeserver.mymatrixhost.com": adminCode language: YAML (yaml)

At last, we need to confirm the permission configuration, and matrixadmin is the administrator account we created.

Register the AppService

The configuration file is done, and we can start to generate the AppService registration file now. Let’s rerun the following command.

docker run --rm -v `pwd`:/data:z dock.mau.dev/mautrix/whatsapp:latestCode language: Bash (bash)

One new file named registration.yaml will be in the configuration folder, and we need to move this file to the Synapse configuration folder and rename it to a recognizable name.

cp registration.yaml /var/lib/docker/volumes/synapse-data/_data/mautrix-whatsapp-registration.yamlCode language: Bash (bash)

Next, let’s update the homeserver.yaml of Synapse to register the AppService, as below.

trusted_key_servers:
  - server_name: "matrix.org"
app_service_config_files:
  - /data/mautrix-telegram-registration.yaml
  - /data/mautrix-whatsapp-registration.yaml

# vim:ft=yamlCode language: YAML (yaml)

We can see the other registered AppService related to Telegram and will explain this.

Start the Bridge to WhatsApp

Since we set http://mautrix-whatsapp:29318 as the address of appservice, name the container as mautrix-whatsapp, and link it to synapse-net, we start it with the following command.

docker run --restart unless-stopped --name mautrix-whatsapp --net synapse-net -v `pwd`:/data:z dock.mau.dev/mautrix/whatsapp:latestCode language: Bash (bash)

Use Matrix to Bridge the WhatsApp Sessions

After starting the bridge and restarting the Synapse, the bridge will work. To initial the bridge service, we need to add @whatsappbot:homeserver.mymatrixhost.com into the client’s contact list, such as FluffyChat, and send login to it. In this case, the whatsappbot will initiate the session to log in WhatsApp. The whole process is similar to logging in the browser version of WhatsApp. I think this bridge is a wrap of the browser version of WhatsApp.

Now, the bridge is starting to deliver the WhatsApp sessions to FluffyChat via Matrix. And we can check on the bridge to Telegram.

Deploy the Bridge to Telegram

Telegram Configuration

The deployment is similar to deploying the bridge to WhatsApp. Create the configuration folder and generate the configuration file.

mkdir mautrix-telegram && cd mautrix-telegram.
docker run --rm -v `pwd`:/data:z dock.mau.dev/mautrix/telegram:latestCode language: Bash (bash)

Also, we need to update the addresses of Matrix and the bridge to Telegram.

# Homeserver details
homeserver:
    # The address that this appservice can use to connect to the homeserver.
    address: http://synapse:8008
    # The domain of the homeserver (for MXIDs, etc).
    domain: homeserver.mymatrixhost.com
    # Whether or not to verify the SSL certificate of the homeserver.
    # Only applies if address starts with https://
    verify_ssl: false
    # What software is the homeserver running?
    # Standard Matrix homeservers like Synapse, Dendrite and Conduit should just use "standard" here.
    software: standard
    # Number of retries for all HTTP requests if the homeserver isn't reachable.
    http_retry_count: 4
    # The URL to push real-time bridge status to.
    # If set, the bridge will make POST requests to this URL whenever a user's Telegram connection state changes.
    # The bridge will use the appservice as_token to authorize requests.
    status_endpoint:
    # Endpoint for reporting per-message status.
    message_send_checkpoint_endpoint:
    # Whether asynchronous uploads via MSC2246 should be enabled for media.
    # Requires a media repo that supports MSC2246.
    async_media: false

# Application service host/registration related details
# Changing these values requires regeneration of the registration.
appservice:
    # The address that the homeserver can use to connect to this appservice.
    address: http://mautrix-telegram:29317Code language: YAML (yaml)

Choose SQLite as the database as well.

    # The full URI to the database. SQLite and Postgres are supported.
    # Format examples:
    #   SQLite:   sqlite:///filename.db
    #   Postgres: postgres://username:password@hostname/dbname
    database: sqlite://db.dbCode language: YAML (yaml)

E2EE configuration.

    # End-to-bridge encryption support options.
    #
    # See https://docs.mau.fi/bridges/general/end-to-bridge-encryption.html for more info.
    encryption:
        # Allow encryption, work in group chat rooms with e2ee enabled
        allow: true
        # Default to encryption, force-enable encryption in all portals the bridge creates
        # This will cause the bridge bot to be in private chats for the encryption to work properly.
        default: trueCode language: YAML (yaml)

Permission configuration

    permissions:
        '*': relaybot
        mymatrixhost.com: full
        '@matrixadmin:homeserver.mymatrixhost.com': adminCode language: YAML (yaml)

Besides all the above, we also need to apply for the API Key of Telegram. I believe this bridge is a wrap of a series of Telegram APIs.

telegram:
    # Get your own API keys at https://my.telegram.org/apps
    api_id: 10000001
    api_hash: 123abcdefghijklmnopqrstuvwxyz123
    # (Optional) Create your own bot at https://t.me/BotFather
    bot_token: disabledCode language: PHP (php)

Obviously, the Key above is fabricated as an example. We must access the Telegram App creation page to apply for the API Key. When applying, ensure that the URL should be the domain name of your Matrix service, homeserver.mymatrixhost.com we assumed.

Register the AppService

The same as registering the bridge to WhatsApp.

docker run --rm -v `pwd`:/data:z dock.mau.dev/mautrix/telegram:latest
cp registration.yaml /var/lib/docker/volumes/synapse-data/_data/mautrix-telegram-registration.yamlCode language: Bash (bash)

Update the Synapse configuration file as below.

trusted_key_servers:
  - server_name: "matrix.org"
app_service_config_files:
  - /data/mautrix-telegram-registration.yaml
  - /data/mautrix-whatsapp-registration.yaml

# vim:ft=yamlCode language: YAML (yaml)

Start the Bridge to Telegram

Since we set http://mautrix-telegram:29317 as the address of appservice, name the container as mautrix-telegram, and link it to synapse-net, we start it with the following command.

docker run --restart unless-stopped --name mautrix-telegram --net synapse-net -v `pwd`:/data:z dock.mau.dev/mautrix/telegram:latestCode language: Bash (bash)

Use Matrix to bridge the Telegram Sessions

After starting the bridge and restarting the Synapse, the bridge will work. To initial the bridge service, we need to add @telegrambot:homeserver.mymatrixhost.com into the client’s contact list, such as FluffyChat, and send login to it. In this case, the telegrambot will initiate the session to log in Telegram. The whole process is similar to logging in Telegram.

Now, the bridge is starting to deliver the Telegram sessions to FluffyChat.

All-in-One E2EE IM Service

It took me nearly two days to adapt to FluffyChat and Matrix. Now I have turned off WhatsApp and Telegram notifications and used FlullyChat and self-host Matrix to handle my daily IM needs.

At last, do not forget to use the firewall to block the inbound traffic to Port 29317 and 29218 being listened to by the bridges.
My Nostalgia for Physical QWERTY Keyboard Phones

Recently I got a niche physical QWERTY keyboard phone named Unihertz Titan Slim. This phone ignited my enthusiasm for QWERTY keyboard phones again, so I am starting to draft this post to note this enthusiasm.

From what I can recall, it was in 2008 when I was still studying for my master’s degree. I was totally a Microsoft fan, and using my first touchscreen cellphone, which was running Windows Mobile OS. It was pretty interesting because I could flash the phone with different kinds of third-party ROMs sometimes and also could implement cellphone-dedicated software by myself in C# when I could not find suitable software to meet my own requirements. We even did not call software an App. But I must say, the touchscreen didn’t provide a good experience. Also, the interaction of mobile OS was not fully evolved, and most of the operations should be performed with a stylus.

Samsung i718

One of my classmates, Solrex, introduced his BlackBerry cellphone to me. Although the BlackBerry cellphone also has a non-touchscreen like other mainstream phones, its OS, together with the side pressable scroll wheel, made a pretty fluent interaction that totally attracted me. After that, I also got a second-hand BlackBerry 8700 for myself. As I know, only second-hand BlackBerry phones were available in China in 2008.

BlackBerry 8700

This became my first physical QWERTY keyboard cellphone.

Blackberry 8700

At a time when stroke and nine-grid input methods were dominating, the QWERTY keyboard was kinda a breath of fresh air in the cellphone market. The experience brought by the full keyboard really kept me from using the numerical nine-grid keyboard for quite a long while. Furthermore, the fluent experience of the pressable scroll wheel significantly overpassed the most popular combination of arrow and confirmation buttons. At that time, BlackBerry mainly focused on the business sector, and it was deniable that BlackBerry made a lot of effort to hardware interaction to improve the efficiency of the operation to a new level.

Actually, for quite a long while, BlackBerry was just a niche brand focusing on the business sector until former U.S. President Obama made a stubborn decision that brought BlackBerry into public sight. Theoretically, Obama should replace his own cellphone with a presidential cellphone when moving into the White House, but Obama insisted on retaining his BlackBerry cellphone. This interesting decision successfully pushed BlackBerry into the headlines.

With the rising market domination of Android and iPhone, most of the Apps stopped to improve the compatibility with BlackBerry OS, so I had to stop to use a physical QWERTY keyboard cellphone. Still, I never stopped to wait for BlackBerry to release a new fantastic product. Finally, it came.

BlackBerry Passport

BlackBerry is called Passport because its shape and size are the same as a passport.

Size of Blackberry Passport

Its unique design language, such as the square screen, deeply attracted me. Furthermore, BlackBerry innovatively added a touch feature to the QWERTY keyboard that can allow you to scroll through menu items and browse web pages by sliding your fingers on the keyboard, which really amazed me.

Navigating the cursor by sliding your fingers on the keyboard

Moreover, the BlackBerry OS 10 running on BlackBerry Passport supports Android Apps, although only up to Apps of Android 2.3, this definitely could meet daily requirements at that moment. This was one of the significant reasons I used the BlackBerry QWERTY keyboard cellphone again.

To buy this phone, I tried overseas shopping for the first time. I ordered from the US BlackBerry official site, and shipped it to Hong Kong, then asked my friend to help bring it from Hong Kong to mainland China.

Generally speaking, except for the UI compatibility issue caused by the square screen, all is well 😄.

The End of BlackBerry Cellphone

Since 2016, BlackBerry has stopped to develop any cellphone hardware. Instead, it started to license third-party companies to release cellphones. Although BlackBerry no longer developed hardware, it still participated in the design part, so several cellphones released by TCL, one of the third-party licensed companies, such as BlackBerry KEYone, was still good product. However, TCL also claimed it would not design and release any BlackBerry cellphones in 2020. BlackBerry ended all the BlackBerry cellphone services in 2022, leading to the end of BlackBerry cellphones.

One Gift to Physical QWERTY Keyboard Cellphone Enthusiasts

Although BlackBerry phones have exited the stage of history, there are still some niche companies carrying on this nostalgia, such as Unihertz. The cellphones released by this company are all very niche and distinctive. For example, the Atom XL, which is also a walkie-talkie; the Jelly series, featuring the smallest 4G phone in the world; the Tank with a terribly long battery life (22000 mAH); and the Titan series that replicates BlackBerry cellphones with a physical QWERTY keyboard.

Titan Brought me Back to BlackBerry.

Unihertz Titan

Because of my love for BlackBerry Passport, Titan caught me at first glance. Although there was really a big gap between Titan and BlackBerry Passport, some of Titan’s design elements made me feel that Unihertz truly understands some of the characteristics and pain points of BlackBerry.

The Dilemma of the Square Screen

The most frequent problem during the usage of BlackBerry is that some of the applications cannot be compatible with the square screen. However, Titan allows us to toggle the mini mode, which can change the aspect ratio of the screen’s display area by wiping the screen downward with three fingers. This is really convenient.

Toggle Mini Mode

Excellent Inheritance and Optimization

Also, besides inheriting some advantages from BlackBerry Passport, such as using the keyboard as a touchpad, and physical QWERTY keyboard, it provides the Kika input method that is highly optimized for a physical QWERTY keyboard.

Too Heavy!

No matter whether Titan is a replica of the BlackBerry Passport or a rugged cellphone, it is both qualified. But it is so heavy that it causes wrist soreness after using it for a while. Maybe the good thing is this can significantly reduce my screen hours. Besides this, with the rising complication and functionalities integration of applications, the square screen definitely becomes a terrible bottleneck.

The high frequent toggle of mini mode and heavyweight made me eagerly hope that Unihertz will release a slim and relatively light physical QWERTY keyboard cellphone. Finally, Titan Slim came.

Titan Slim

Unihertz Titan Slim

In the image above, Titan is on the left; in the middle, it is Titam Slim, and on the right is Titan Pocket. Titan Pocket was released after Titan before Titan Slim. Although it is lighter, its square screen made me give up.

Unihertz Titan Slim

Regarding hardware and software, Titan Slim has certain improvements compared to Titan, but it does not have significant changes overall. Besides inheriting several UI features from Titan, such as using the keyboard as a touchpad, physical QWERTY keyboard, etc., finally, it uses a rectangle screen to replace the square screen to have better compatibility with current mainstream Apps. Maybe due to the physical QWERTY keyboard, Titam Slim is still relatively thick, but at least it is much lighter compared to Titan. Long use of this cellphone doesn’t easily cause wrist soreness. So at present, Titan Slim is my primary cellphone.

Will BlackBerry Like Cellphone Continue?

In fact, continuing with BlackBerry is not an easy thing. Nowadays, niche manufacturers such as Unihertz are still remastering BlackBerry cellphones, and I can’t say the remasters are perfect or satisfying. To continue with BlackBerry, I have to make some compromises. For example, Samsung is my favorite none physical keyboard cellphone brand, but I had to temporarily say goodbye to physical QWERTY keyboard cellphones to use Samsung cellphone. And now I need to leave my Samsung cellphone for a while to use Titan Slim as my primary cellphone. Maybe the only thing that comforts me a little is mostly I need two cellphones, one for primary use and one for work. But actually, the screen hours of my work cellphone are very few. Mostly, I use my work laptop.

So I always hope that a more perfect physical QWERTY keyboard cell phone will come so that I don’t need to make compromised choices.

reMarkable 2: One Highly Customisable New Toy

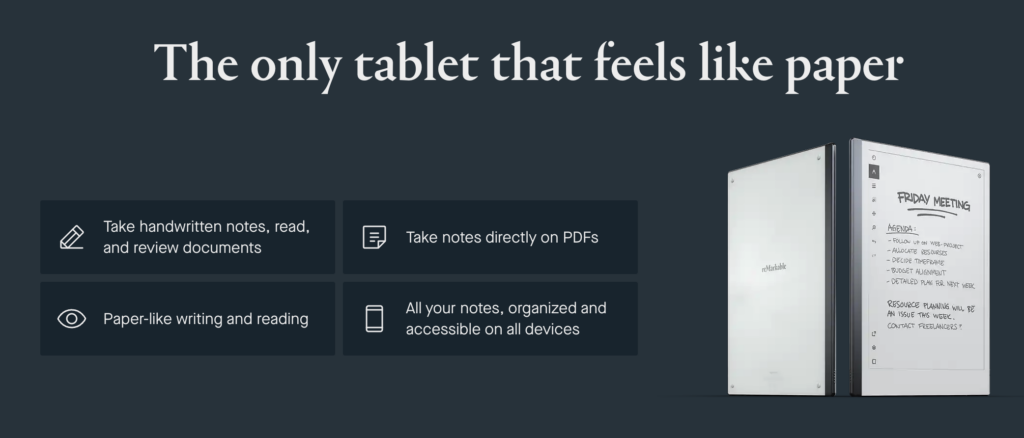
Got the budget on my birthday, and the Black Friday deal was not bad, so I finally got a new toy: the reMarkable 2. 😂

reMarkable 2
reMarkable 2

Before I got this tablet, several guys recommended this to me, and what finally convinced me to buy it was no more than its extreme paper-like writing, thinness, lightness, design, etc. But after I experienced this reMarkable 2, I found its usefulness and customizability were totally beyond my expectation. The most surprising thing is that reMarkable OS is based on Linux and the manufacturer generously exposes the SSH port and root password.

During the year-end holiday, I went through this tablet a lot and would take notes with this post.

Functionality Completeness

Language Issues

The reMarkable 2 does not support non-Latin characters, so CJK (Chinese, Japanese, and Korean) characters are displayed as squares, as below.

Squares
Squares

One compromised solution is to use PDF only if possible, but we still need to ensure that all the necessary fonts are embedded in the PDF documents. If any CJK characters apply fonts not embedded in the documents, they will still be displayed as squares.

Luckily, the OS of reMarkable is based on Linux, and the SSH and the root password are available, so we can easily install the CJK fonts. Take this page as a reference for installing the RMPKG.

cd /tmp;
wget https://files.davisr.me/projects/rcu/download-fontrmpkg/NotoSansCSFont.rmpkg
wget https://files.davisr.me/projects/rcu/download-fontrmpkg/NotoSansCTFont.rmpkg
wget https://files.davisr.me/projects/rcu/download-fontrmpkg/NotoSansJPFont.rmpkg
wget https://files.davisr.me/projects/rcu/download-fontrmpkg/NotoSansKRFont.rmpkg
chmod +x *.rmpkg
./NotoSansCSFont.rmpkg --install
./NotoSansCTFont.rmpkg --install
./NotoSansJPFont.rmpkg --install
./NotoSansKRFont.rmpkg --install
rm -f *.rmpkgCode language: Bash (bash)

And the Noto Sans font can support CJK characters now.

Type Diversity

The reMarkable 2 only natively supports PDF and EPUB, but more is needed. Toltec, this community-maintained repository of free software for the reMarkable tablet, helps. With Toltec, we can install KOReader into reMarkable 2. Thanks to the powerful format compatibility, we can read documents in almost all major formats with the reMarkable 2.

## Use opkg to install remux and koreader after installing the Toltec
opkg update
opkg upgrade
# remux
# Launcher that supports multi-tasking applications 
opkg install remux
# KOReader
# Ebook reader supporting PDF, DjVu, EPUB, FB2, and many more formats
opkg install koreaderCode language: Bash (bash)

There is one thing that needs to be highlighted. The shelves of the reMarkable and KOReader do not share; we can surely use cloud storage to solve this. I will share this later. Before installing the Toltec, please ensure that the current Toltec release can support the OS version of your reMarkable tablet.

The Toltec repository includes lots of exciting software. Take your time to go through it if you are interested.

Article Management and Document Management

The reMarkable provides a browser extension. With this extension, users can convert web pages into EPUB documents and put them on the reMarkable’s shelf with one click. It is really convenient, but it is hard for me to get used to it.

  1. The format of the EPUB document content converted by the extension looks strange.
  2. Years of using Pocket as a read-it-later application make me not plan to switch to reMarkable. And I don’t want to put all my saved web pages on the reMarkable’s shelf.

So I started automating pushing the saved pages from Pocket to reMarkable, and I recalled n8n, an open workflow automation platform.

I heard about n8n before, and I tried this time and found it was really convenient. I deployed n8n on the NAS, then created this workflow quickly. You may see that the UI of workflow on n8n is really visual and user-friendly.

Pocket 2 Google Drive

I use a scheduler to trigger the workflow below.

  1. Get the saved timestamp of the last run, and retrieve the pages saved after the last run. The API for retrieving the saved pages has an optional parameter: since. With this parameter, Pocket will only return items modified since the given UNIX timestamp.
  2. If the list is not empty, the workflow will use the OneSimpleAPI to convert the web pages into PDF documents and upload them to Google Drive one by one.
  3. Update the saved timestamp to present.

The above workflow nodes of OneSimpleAPI and Google Drive are natively supported by the n8n and are very easy to call.

These tips may reduce some of the confusion when you are creating a similar workflow:

  1. The since parameter of Pocket API uses the last modified time as a reference. If you would like to push some outdated saved pages to Google Drive, you just need to make a slight change to them, such as tag modification and resaving it again, and these pages will be pushed to Google Drive.
  2. When you trigger a deletion of a saved page, Pocket will update the status of this page to 2 before the page is totally removed. So please ensure all the saves whose status is 2 will be filtered out to prevent unnecessary uploading.

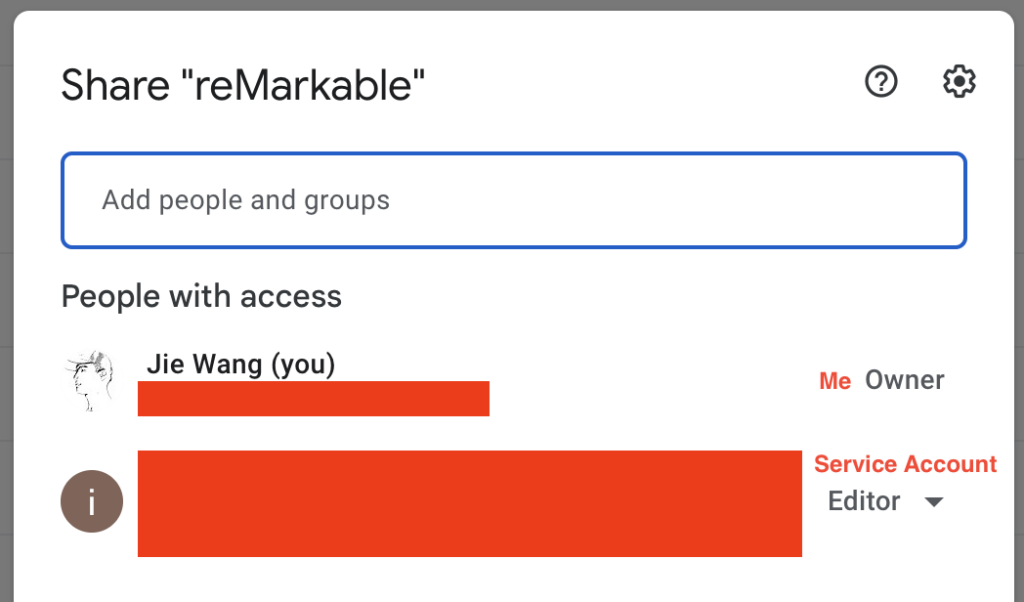
The Google Drive node supports two authentication methods: OAuth 2 and ServiceAccount. OAuth 2 requires that your callback URL contains a domain name other than an IP. For security, my NAS blocks all direct external access and only allows VPN access, so I have not bound my NAS to any domain name. So anyone whose NAS is in the same situation as mine, please prefer ServiceAccount. Primarily the service account is not your Gmail account, so please grant the R/O permission to the Google Drive folder of your reMarkable documents to the service account.

Permissions Granted to Service Account

Actually, I can directly push the documents onto the reMarkable shelf, but I don’t think this is a good idea. The limitation of documents’ count on the reMarkable shelf can help me focus more on the current readings before I pick new readings from Google Drive. I will not let too many documents mess up my reMarkable shelf.

As I mentioned, the shelves of KOReader and reMarkable 2 don’t share, so using Google Drive to store my pending readings can make the shelves tidier. It is also easy for KOReader and reMarkable 2 to retrieve the documents wirelessly.

Publication management

Ages before, I started to use Calibre to manage publications, such as novels, books, comics, papers, etc. Then I moved the library of Calibre to NAS and ran Calibre Web in a Docker container so that I could manage the publications from any device.

Calibre Web is not an official product of Calibre, and there is more than one fork on GitHub. I prefer the image managed by linuxserver.io. If you have never used Calibre before deploying Calibre Web, you will need a new library file (metadata.db) to initiate the configuration. You can install Calibre to create a library or download it from here.

Besides the publication management via web UI, Calibre Web also supports the OPDS catalog.

The Open Publication Distribution System (OPDS) Catalog format is a syndication format for electronic
publications based on Atom and HTTP. OPDS Catalogs enable the aggregation, distribution, discovery,
and acquisition of electronic publications.

OPDS Catalogs use existing or emergent open standards and conventions, with a priority on simplicity.

OPDS Catalog 1.2

In this way, I can search for publications from the OPDS catalog.

# curl --user {username}:{password} "http://{IP}:{port}/opds/search/{queryString}"
curl --user username:password "http://{IP of NAS}:8083/opds/search/root%20cause"Code language: Bash (bash)

If items exist, the OPDS catalog will send an XML containing publication information, including book names and links, as a response.

<?xml version="1.0" encoding="UTF-8"?>
<feed
  xmlns="http://www.w3.org/2005/Atom"
  xmlns:dc="http://purl.org/dc/terms/"
  xmlns:dcterms="http://purl.org/dc/terms/">
  <id>urn:uuid:2853dacf-ed79-42f5-8e8a-a7bb3d1ae6a2</id>
  <updated>2022-12-29T16:23:55+00:00</updated>
  <link rel="self"
        href="/opds/search/root cause?"
        type="application/atom+xml;profile=opds-catalog;type=feed;kind=navigation"/>
  <link rel="start"
        href="/opds"
        type="application/atom+xml;profile=opds-catalog;type=feed;kind=navigation"/>
  <link rel="up"
        href="/opds"
        type="application/atom+xml;profile=opds-catalog;type=feed;kind=navigation"/>
  <link rel="search"
      href="/opds/osd"
      type="application/opensearchdescription+xml"/>
  <link type="application/atom+xml" rel="search" title="Search" href="/opds/search/{searchTerms}" />
  <title>Calibre-Web</title>
  <author>
    <name>Calibre-Web</name>
    <uri>https://github.com/janeczku/calibre-web</uri>
  </author>
  <entry>
    <title>Root Cause Analysis Handbook</title>
    <id>urn:uuid:06a66a9a-59d4-415b-a472-a413b8cf923d</id>
    <updated>2022-12-22T07:56:20+00:00</updated>
    <author>
      <name>ABS Consulting</name>
    </author>
    <publisher>
      <name>Rothstein Publishing</name>
    </publisher>
    <dcterms:language>eng</dcterms:language>
    <category scheme="http://www.bisg.org/standards/bisac_subject/index.html"
              term="Business &amp; Economics"
              label="Business &amp; Economics"/>
    <summary>Are you trying to improve performance, but find that the same problems keep getting in the way? Safety, health, environmental quality, reliability, production, and security are at stake. You need the long-term planning that will keep the same issues from recurring. Root Cause Analysis Handbook: A Guide to Effective Incident Investigation is a powerful tool that gives you a detailed step-by-step process for learning from experience. Reach for this handbook any time you need field-tested advice for investigating, categorizing, reporting and trending, and ultimately eliminating the root causes of incidents. It includes step-by-step instructions, checklists, and forms for performing an analysis and enables users to effectively incorporate the methodology and apply it to a variety of situations. Using the structured techniques in the Root Cause Analysis Handbook, you will: Understand why root causes are important. Identify and define inherent problems. Collect data for problem-solving. Analyze data for root causes. Generate practical recommendations. The third edition of this global classic is the most comprehensive, all-in-one package of book, downloadable resources, color-coded RCA map, and licensed access to online resources currently available for Root Cause Analysis (RCA). Called by users &#34;the best resource on the subject&#34; and &#34;in a league of its own.&#34; Based on globally successful, proprietary methodology developed by ABS Consulting, an international firm with 50 years&#39; experience in 35 countries. Root Cause Analysis Handbook is widely used in corporate training programs and college courses all over the world. If you are responsible for quality, reliability, safety, and/or risk management, you&#39;ll want this comprehensive and practical resource at your fingertips. The book has also been selected by the American Society for Quality (ASQ) and the Risk and Insurance Society (RIMS) as a &#34;must have&#34; for their members.</summary>
    <link type="image/jpeg" href="/opds/cover/30" rel="http://opds-spec.org/image"/>
    <link type="image/jpeg" href="/opds/cover/30" rel="http://opds-spec.org/image/thumbnail"/>
    <link rel="http://opds-spec.org/acquisition" href="/opds/download/30/pdf/"
          length="24812876" mtime="2022-12-22T07:56:20+00:00" type="application/pdf"/>
  </entry>
</feed>Code language: HTML, XML (xml)

Based on this, I created the workflow below to upload the document I need to Google Drive automatically.

Query the books and upload the needed books to Google Drive.
Search for the book and upload the needed books to Google Drive.

I use the Webhook node to pass the query string to the OPDS catalog to search for the publications.

Others

There are many functionalities worth going through on reMarkable, such as templates. I am amazed by the completion of reMarkable’s support for PDF, especially the support for the internal links. Many E-ink tablets almost don’t support internal links in PDF documents. Even to support some significant internal links such as tables of contents, they compromise toggle a menu to help users locate the pages instead of jumping during the document reading.

So we can generate templates with reCalendar. This template can help us plan and summarize in a year-month-day dimension. To prevent loading too long, the timespan of the preview below is only two months. You can also tweak the template by adding special dates, modifying the timespan, etc., with reCalendar.

Loader Loading…
EAD Logo Taking too long?

Reload Reload document
| Open Open in new tab

Here is all about reMarkable 2 I learned. I will keep digging and will share more. 😁

Talking about Device Management and Multi-computer Management: Is Wireless Always More Convenient than Wiredness?

As a former CS student and an ITer, the computer has become an inevitable part of my life. And also how to well manage the computers and peripherals is always a changing problem.

Why does this problem keep changing?

Environments Decide the Requirements

When I was in university, what I could control was just a tiny desk in the dormitory. So at that moment, I hoped all the peripherals would be slim and wireless so I could quickly put the mouse and keyboard into the drawer without unplugging the cable.

I have to say that if we forget to turn off the mouse and keyboard, the receiver drains the battery really fast 😂. There was no Bluetooth then, and the early versions of Bluetooth were unsuitable for data transmission between computers and peripherals.

One Wireless Mouse and Its Receiver

Looking at the HUGE CRT and chassis, having a laptop became my dream then. In this way, I could take it everywhere. Especially during summer and winter vacations, I could take it home 🤭.

CRT and Chassis
CRT and Chassis

After graduating, nearly all my computers are laptops. And due to Apple, most manufacturers are simplifying the ports on the laptop, so I have to make sure most of the peripherals should support Bluetooth. Then, due to the need for confidentiality at work, I had to ensure all Bluetooth devices could memorize multiple pairs to separate my personal laptop and office laptop so that I could conveniently switch one set of peripherals between my personal laptop and office laptop.

Is Wireless Always More Convenient than Wiredness?

However, due to the requirements of my employer and myself, my device management has become incredibly complicated 🤦. I need to ensure one set of peripherals can switch smoothly across four laptops and one chassis. Obviously, Bluetooth is unable to handle this.

By the way, owning five laptops is not weird. When I was working on a mobile project at my former former company, I had more than ten cellphones, several tablets, and four computers, but of course, nearly all of them did not belong to me but my employer. At that moment, there was no cloud testing platform for mobile projects, so all the tests needed to be processed on local devices.

Let’s get back to the main topic. Luckily most of the peripherals I had were dual mode, which means supporting cable and Bluetooth; this made me figure out a compromised solution. I connected the keyboard, mouse, and display to one multiport adaptor, and I could easily switch this adaptor from the currently connected computer to another chosen one. Since the COVID situation is not so intense, I sometimes need to go to the office. When I need to go to the office, I can unplug the display and put the laptop into my backpack with the adaptor, keyboard, and mouse.

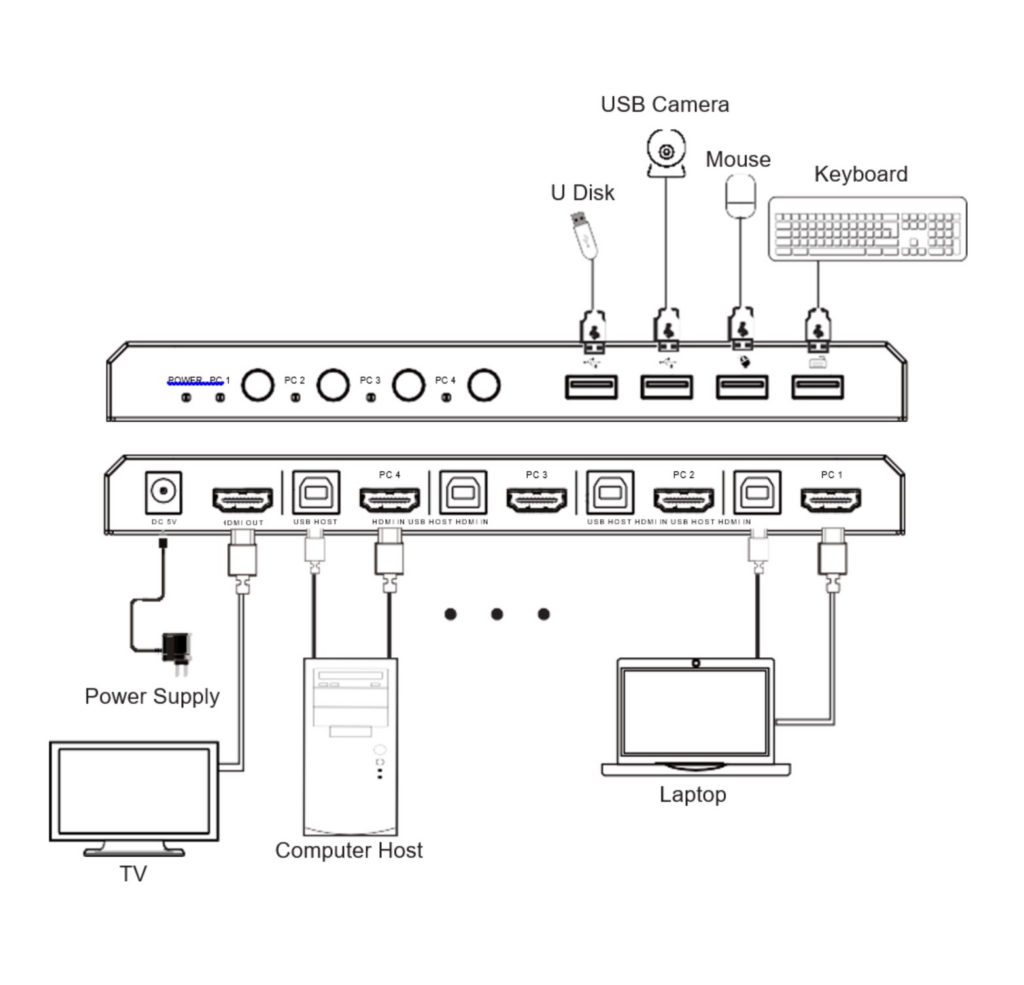
Days ago, one question popped up in my mind. If a device named HDMI switch can switch the video sources smoothly, why is there not a device that can help us conveniently switch the peripherals across the computers? Then I found it, and it is KVM Switch. This KVM is not a Kernel-based Virtual Machine; it is the abbreviation of Keyboard, Video, and Mouse.

KVM switch (with KVM being an abbreviation for “keyboard, video, and mouse”) is a hardware device that allows a user to control multiple computers from one or more sets of keyboardsvideo monitors, and mice.

From Wikipedia
KVM Switch Diagram
KVM Switch Diagram

This switch really saved my life. I don’t need to leverage more than one set of peripherals to cover all my computers or don’t need to plug in and out whenever I switch across my laptops. This switch also makes my desktop tidier, although it is still not quite tidy.

Choose the Suitable KVM Switch

The type of KVM switches varies and is not easy to choose. If you want one, keep an eye on the tech specs, especially the HDMI part.

  1. Confirm the number of devices you would like to switch across.
  2. The type of USB ports. Due to the velocity gap between USB 1 and USB 2, consider it based on your own devices, such as whether you have external high-capacity storage devices or others.
  3. The type of HDMI ports. If you have devices supporting HDMI and Dolby Vision, such as Apple TV and Xbox Series X, please check whether your chosen KVM switch supports this. And HDR has several types of video formats, such as HDR, HDR 10, HDR 10+. The same as audio, its encoding varies.
  4. High resolution and refresh rates are pretty important for video and game enthusiasts.
  5. And also, hot-swapping affects the user experiences a lot.

Hopefully, this small talk can help guys with multiple computers a little.

The Method that I Used to Improve My English Initially

Hi,

Actually, this post is not suitable for English native speakers or guys that are good at English. To avoid wasting any chances to improve my written English, I still put an English version of this post here. If you are interested in the Chinese version, feel free to switch with the language switcher in the menu or widget.

Best regards and thanks,
Jie

I have worked at a company where nearly no one speaks Chinese for more than one year. During the chitchat, most colleagues seemed quite amazed when they learned that I had never worked in an English-speaking environment or studied abroad. This also tells one thing that is mute English is prominent in China.

These days some of my friends in China come to ask me to share how to improve my English. My English still sucks, many guys are excellent at English without experience working and studying abroad, and I don’t dare to claim that I can teach. However, I still decided to share the method that I used to improve my English initially, and I hope this post can help buddies who would like to lead some changes in their lives find the entry for practicing English 😄.

Open your mouth

Actually, I occasionally started my English practicing. At that moment, I had just moved from Beijing to Hangzhou, so I nearly had no friends. To make some friends not among my colleagues, I decided to have a try in some English corners.

Luckily, I found an English corner called Have Fun English Club and made several exciting friends. Here I should say thank you to these friends because I couldn’t get through an extremely dark period in my life without them. In the beginning, I am a typical minor mute English speaker. I could talk really a lot very fast in Chinese, but when I switched to English, I became a low-voice stammerer. Thanks to my thick skin, I quickly became one of them. At that moment, I told myself that mistakes were acceptable, but retreat was absolutely not allowed. 🤣 To make more friends, I applied to be a volunteer at HFEC. As a volunteer, I needed to help initiate topics for activities and act as the Group Leader during the activities. Gradually practicing English became one of my favorite things. (I will draft another post introducing how we run the English club. Our way is quite unique and one of the most popular. Some other English corners learn from our way.)

After a short while, HEFC was disbanded due to some internal issues. Suddenly we were bored when out of English club activities. To continue improving our spoken English and make more friends, we, friends known at HEFC, founded Whatever English Club. We ran it the same way as HEFC and added more game elements. It was pretty good and became popular among local English corners.

To improve spoken English, don’t give yourself too much pressure, especially in the beginning. For example, don’t care too much about the accents. If you have a chance to talk to many foreigners, you will see that there are a large number of kinds of accents around the world. You will also see that the accents can never cover their excellent English skills. Also, don’t care too much about making mistakes. We always make mistakes even when speaking in our mother tongue, so why do we need to care about making mistakes when speaking in English. Mistakes lead to rectifications which lead to improvement.

Regard yourself as a primary school student

Many friends mention that they always stumble when speaking in English because their mouths cannot catch their brains. But why the month cannot catch the brain is hard to clarify.

Once, someone told me that why Chinese are bad at speaking English is mainly due to our excessively excellent Chinese.

I think this really makes sense, and let me share my understanding. When you just started learning English, I believe whenever you would like to speak in English, firstly, you would figure out how to say it in Chinese, and secondly, you would translate that into English and speak out. But Chinese is our native Tongue, and Chinese and English belong to two totally different language families. So when you were trying to translate these beautiful Chinese lines into English, you would be stuck entirely and end with ”err…”.

Therefore my way was to force myself to become a primary school student. Whenever I would like to express sth. in English, I would use the basic subject-verb-object structure to build my line without idioms, proverbs, hymns, and other literary techniques. So that it would be much easier for me to translate the lines into English, the fewer chances I am stuck, the more confident I am, and the longer I will keep practicing.

Regard yourself as a foreigner

We may always face such a situation when speaking in English with another non-English speaker. For example, during a conversation in an English corner or during a session with my Polish colleagues. The situation is they may not be able to understand a word or a phrase we mentioned. If we don’t practice enough, the conversation will end with a long awkward silence.

So after becoming a primary school student, I began to try to make myself a foreign primary school student. I started to look up words in English-English dictionaries instead of English-Chinese dictionaries. After that, I gradually became able to explain it in another way in English to others when they could not understand what I said. In my opinion, this is a beneficial English communication skill.

By the way, I have not memorized words based on a word list for a long time, and it is much easier for me to remember new words I meet when I look them up in English-English dictionaries. Meanwhile, Lexico became one of my favorite sites.

Make yourself in a “foreign country”.

Someone always says that the environment is significant to learning English, so guys in a foreign country improve their English really fast. I may say this is half right and half wrong, cause English learning can really benefit a lot from a suitable environment. But it doesn’t mean that all the ex-pats count. Some guys that work in a team full of Chinese speakers speak only in Chinese during working hours and still talk in Chinese with family after work. The only chances that need English are shopping and dining. So their English has not been significantly improved even after years.

I watched TV series with only English subtitles to immerse myself in English. We may not understand a lot initially, but English subtitles can also help us accelerate our reading velocity. Although I also like to watch movies, I watch TV series much more than movies because the lines in TV series are closer to life than in movies. And this makes the immersion more real. If the lines are too difficult, English animation may be a better choice as a kickstart because guys talk slower with simple words in most English animation. I don’t use all but most here because there are exceptions. For example, the speed of speech and vocabulary are both terrible in Rick and Morty. After a long while, I began playing with my cellphone while watching the videos. If I couldn’t catch, I would reverse a little. I know this really made me spend more time finishing watching every episode, but it was worth trying because gradually, I was able to listen to English lines as to Chinese ones. For example, I am drafting this post while watching one of the episodes of Young Sheldon. Because when we are listening to guys chatting in Chinese, we don’t need to concentrate on that. Thanks to this practice, now I can have sessions with guys in another time zone at noon when I have a lunch box. Besides this, I also listened to English podcasts, news, TV series lines, etc., when performing things that needed less concentration, such as commuting, cooking, surfing the Internet, etc. By the way, I think listening to the news is the hardest because they are all very short and mostly have no contextual relationship to the previous one and the next one.

Let me share the milestones of improving my listening and sense of English:

  • One day, I found that I didn’t need to stare at the subtitles all the time.
  • One day, I found that I could catch the pace even though I played with my cellphone during the video play.
  • One day, I found that I could pick out the errors in the subtitles.
  • One day, I found that I could be aware of the story even though I played with my cellphone during the video play.
  • One day, I found that I could get their point when someone suddenly talked to me in English.
  • One day, I found that I could understand the whole story after watching the video without subtitles.

The change above is the process from quantitative to qualitative change based on long-term practice. In a word, do keep practicing patiently.

But I also should admit that if you stay in a foreign country and fully use this environment, your English can improve significantly. At least, my improvement here is much faster than before; of course, this also benefits from fundamentals accumulated by my long-time practice.

Result Evaluation

I worked really happily in Hangzhou but still faced some issues, so I tried several overseas companies when I just became into practicing English. As I expected, all ended due to poor communication in English. Ages later, my baby was born, and I would like to make some changes to my life. I tried four companies and came across many rounds of interviews in English with Indian, Irish, American, Italian, Japanese, Singaporean, or Chinese interviewers. And all of them issued offers to me. This really encouraged me to keep practicing my English.

Rule No. 1 to make your practicing count is that do not deceive yourself. Don’t make English learning become your excuse to be a video addict. And watching them for English learning is the key.

Do not waste any chance to practice your English.

The longer I worked in the current company, the more shortcomings in English I found. For example, my poor written English. I cannot stand my poor English mail, so Grammarly has also become one of my favorite sites. This is also one of the reasons for reopening my blog and setting this up as a bilingual site. Not sure if you have noticed that every post here has two versions of Chinese and English. And you can easily switch between versions with the language switcher in the menu item and the widget. I hope I can improve my written English by writing more. To avoid wasting any chance to practice my English, I also put an English version of this post here even though this post is not suitable for English speakers 🤣.

So much for the stories about my English learning. During English learning, practicing is a complicated and inevitable process. Don’t expect can get this immediately, and giving up too fast means you are not ready to learn English yet. I would be honored if anyone could get just a little from this post. If this post can inspire anyone to practice English, I am happy to hear that.