Got the budget on my birthday, and the Black Friday deal was not bad, so I finally got a new toy: the reMarkable 2. 😂
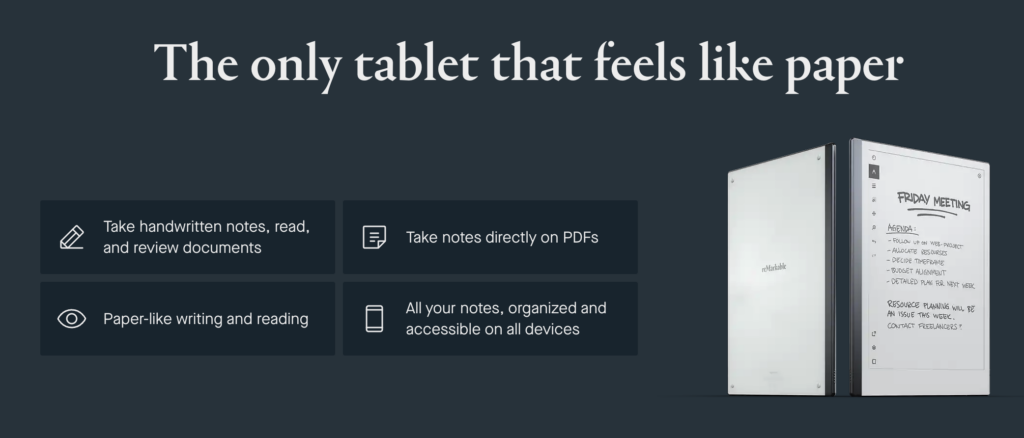
Before I got this tablet, several guys recommended this to me, and what finally convinced me to buy it was no more than its extreme paper-like writing, thinness, lightness, design, etc. But after I experienced this reMarkable 2, I found its usefulness and customizability were totally beyond my expectation. The most surprising thing is that reMarkable OS is based on Linux and the manufacturer generously exposes the SSH port and root password.
During the year-end holiday, I went through this tablet a lot and would take notes with this post.
Functionality Completeness
Language Issues
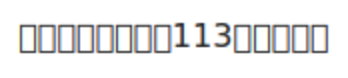
The reMarkable 2 does not support non-Latin characters, so CJK (Chinese, Japanese, and Korean) characters are displayed as squares, as below.
One compromised solution is to use PDF only if possible, but we still need to ensure that all the necessary fonts are embedded in the PDF documents. If any CJK characters apply fonts not embedded in the documents, they will still be displayed as squares.
Luckily, the OS of reMarkable is based on Linux, and the SSH and the root password are available, so we can easily install the CJK fonts. Take this page as a reference for installing the RMPKG.
cd /tmp;
wget https://files.davisr.me/projects/rcu/download-fontrmpkg/NotoSansCSFont.rmpkg
wget https://files.davisr.me/projects/rcu/download-fontrmpkg/NotoSansCTFont.rmpkg
wget https://files.davisr.me/projects/rcu/download-fontrmpkg/NotoSansJPFont.rmpkg
wget https://files.davisr.me/projects/rcu/download-fontrmpkg/NotoSansKRFont.rmpkg
chmod +x *.rmpkg
./NotoSansCSFont.rmpkg --install
./NotoSansCTFont.rmpkg --install
./NotoSansJPFont.rmpkg --install
./NotoSansKRFont.rmpkg --install
rm -f *.rmpkgCode language: Bash (bash)
And the Noto Sans font can support CJK characters now.
Type Diversity
The reMarkable 2 only natively supports PDF and EPUB, but more is needed. Toltec, this community-maintained repository of free software for the reMarkable tablet, helps. With Toltec, we can install KOReader into reMarkable 2. Thanks to the powerful format compatibility, we can read documents in almost all major formats with the reMarkable 2.
## Use opkg to install remux and koreader after installing the Toltec
opkg update
opkg upgrade
# remux
# Launcher that supports multi-tasking applications
opkg install remux
# KOReader
# Ebook reader supporting PDF, DjVu, EPUB, FB2, and many more formats
opkg install koreaderCode language: Bash (bash)
There is one thing that needs to be highlighted. The shelves of the reMarkable and KOReader do not share; we can surely use cloud storage to solve this. I will share this later. Before installing the Toltec, please ensure that the current Toltec release can support the OS version of your reMarkable tablet.
The Toltec repository includes lots of exciting software. Take your time to go through it if you are interested.
Article Management and Document Management
The reMarkable provides a browser extension. With this extension, users can convert web pages into EPUB documents and put them on the reMarkable’s shelf with one click. It is really convenient, but it is hard for me to get used to it.
- The format of the EPUB document content converted by the extension looks strange.
- Years of using Pocket as a read-it-later application make me not plan to switch to reMarkable. And I don’t want to put all my saved web pages on the reMarkable’s shelf.
So I started automating pushing the saved pages from Pocket to reMarkable, and I recalled n8n, an open workflow automation platform.
I heard about n8n before, and I tried this time and found it was really convenient. I deployed n8n on the NAS, then created this workflow quickly. You may see that the UI of workflow on n8n is really visual and user-friendly.
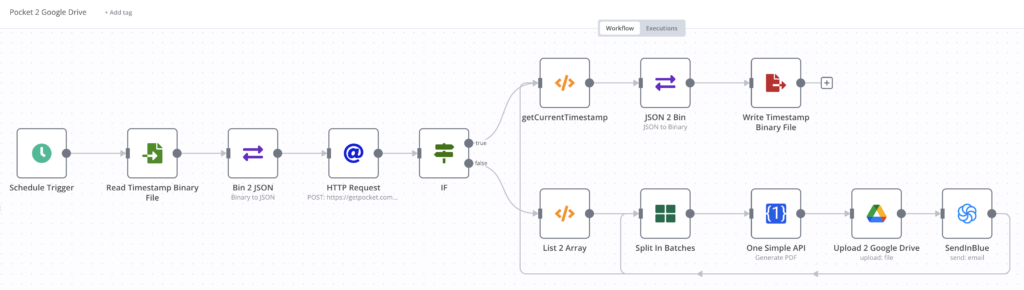
I use a scheduler to trigger the workflow below.
- Get the saved timestamp of the last run, and retrieve the pages saved after the last run. The API for retrieving the saved pages has an optional parameter: since. With this parameter, Pocket will only return items modified since the given UNIX timestamp.
- If the list is not empty, the workflow will use the OneSimpleAPI to convert the web pages into PDF documents and upload them to Google Drive one by one.
- Update the saved timestamp to present.
The above workflow nodes of OneSimpleAPI and Google Drive are natively supported by the n8n and are very easy to call.
These tips may reduce some of the confusion when you are creating a similar workflow:
- The since parameter of Pocket API uses the last modified time as a reference. If you would like to push some outdated saved pages to Google Drive, you just need to make a slight change to them, such as tag modification and resaving it again, and these pages will be pushed to Google Drive.
- When you trigger a deletion of a saved page, Pocket will update the status of this page to 2 before the page is totally removed. So please ensure all the saves whose status is 2 will be filtered out to prevent unnecessary uploading.
The Google Drive node supports two authentication methods: OAuth 2 and ServiceAccount. OAuth 2 requires that your callback URL contains a domain name other than an IP. For security, my NAS blocks all direct external access and only allows VPN access, so I have not bound my NAS to any domain name. So anyone whose NAS is in the same situation as mine, please prefer ServiceAccount. Primarily the service account is not your Gmail account, so please grant the R/O permission to the Google Drive folder of your reMarkable documents to the service account.

Actually, I can directly push the documents onto the reMarkable shelf, but I don’t think this is a good idea. The limitation of documents’ count on the reMarkable shelf can help me focus more on the current readings before I pick new readings from Google Drive. I will not let too many documents mess up my reMarkable shelf.
As I mentioned, the shelves of KOReader and reMarkable 2 don’t share, so using Google Drive to store my pending readings can make the shelves tidier. It is also easy for KOReader and reMarkable 2 to retrieve the documents wirelessly.
Publication management
Ages before, I started to use Calibre to manage publications, such as novels, books, comics, papers, etc. Then I moved the library of Calibre to NAS and ran Calibre Web in a Docker container so that I could manage the publications from any device.
Calibre Web is not an official product of Calibre, and there is more than one fork on GitHub. I prefer the image managed by linuxserver.io. If you have never used Calibre before deploying Calibre Web, you will need a new library file (metadata.db) to initiate the configuration. You can install Calibre to create a library or download it from here.
Besides the publication management via web UI, Calibre Web also supports the OPDS catalog.
The Open Publication Distribution System (OPDS) Catalog format is a syndication format for electronic
publications based on Atom and HTTP. OPDS Catalogs enable the aggregation, distribution, discovery,
and acquisition of electronic publications.OPDS Catalogs use existing or emergent open standards and conventions, with a priority on simplicity.
OPDS Catalog 1.2
In this way, I can search for publications from the OPDS catalog.
# curl --user {username}:{password} "http://{IP}:{port}/opds/search/{queryString}"
curl --user username:password "http://{IP of NAS}:8083/opds/search/root%20cause"Code language: Bash (bash)
If items exist, the OPDS catalog will send an XML containing publication information, including book names and links, as a response.
<?xml version="1.0" encoding="UTF-8"?>
<feed
xmlns="http://www.w3.org/2005/Atom"
xmlns:dc="http://purl.org/dc/terms/"
xmlns:dcterms="http://purl.org/dc/terms/">
<id>urn:uuid:2853dacf-ed79-42f5-8e8a-a7bb3d1ae6a2</id>
<updated>2022-12-29T16:23:55+00:00</updated>
<link rel="self"
href="/opds/search/root cause?"
type="application/atom+xml;profile=opds-catalog;type=feed;kind=navigation"/>
<link rel="start"
href="/opds"
type="application/atom+xml;profile=opds-catalog;type=feed;kind=navigation"/>
<link rel="up"
href="/opds"
type="application/atom+xml;profile=opds-catalog;type=feed;kind=navigation"/>
<link rel="search"
href="/opds/osd"
type="application/opensearchdescription+xml"/>
<link type="application/atom+xml" rel="search" title="Search" href="/opds/search/{searchTerms}" />
<title>Calibre-Web</title>
<author>
<name>Calibre-Web</name>
<uri>https://github.com/janeczku/calibre-web</uri>
</author>
<entry>
<title>Root Cause Analysis Handbook</title>
<id>urn:uuid:06a66a9a-59d4-415b-a472-a413b8cf923d</id>
<updated>2022-12-22T07:56:20+00:00</updated>
<author>
<name>ABS Consulting</name>
</author>
<publisher>
<name>Rothstein Publishing</name>
</publisher>
<dcterms:language>eng</dcterms:language>
<category scheme="http://www.bisg.org/standards/bisac_subject/index.html"
term="Business & Economics"
label="Business & Economics"/>
<summary>Are you trying to improve performance, but find that the same problems keep getting in the way? Safety, health, environmental quality, reliability, production, and security are at stake. You need the long-term planning that will keep the same issues from recurring. Root Cause Analysis Handbook: A Guide to Effective Incident Investigation is a powerful tool that gives you a detailed step-by-step process for learning from experience. Reach for this handbook any time you need field-tested advice for investigating, categorizing, reporting and trending, and ultimately eliminating the root causes of incidents. It includes step-by-step instructions, checklists, and forms for performing an analysis and enables users to effectively incorporate the methodology and apply it to a variety of situations. Using the structured techniques in the Root Cause Analysis Handbook, you will: Understand why root causes are important. Identify and define inherent problems. Collect data for problem-solving. Analyze data for root causes. Generate practical recommendations. The third edition of this global classic is the most comprehensive, all-in-one package of book, downloadable resources, color-coded RCA map, and licensed access to online resources currently available for Root Cause Analysis (RCA). Called by users "the best resource on the subject" and "in a league of its own." Based on globally successful, proprietary methodology developed by ABS Consulting, an international firm with 50 years' experience in 35 countries. Root Cause Analysis Handbook is widely used in corporate training programs and college courses all over the world. If you are responsible for quality, reliability, safety, and/or risk management, you'll want this comprehensive and practical resource at your fingertips. The book has also been selected by the American Society for Quality (ASQ) and the Risk and Insurance Society (RIMS) as a "must have" for their members.</summary>
<link type="image/jpeg" href="/opds/cover/30" rel="http://opds-spec.org/image"/>
<link type="image/jpeg" href="/opds/cover/30" rel="http://opds-spec.org/image/thumbnail"/>
<link rel="http://opds-spec.org/acquisition" href="/opds/download/30/pdf/"
length="24812876" mtime="2022-12-22T07:56:20+00:00" type="application/pdf"/>
</entry>
</feed>Code language: HTML, XML (xml)Based on this, I created the workflow below to upload the document I need to Google Drive automatically.

I use the Webhook node to pass the query string to the OPDS catalog to search for the publications.
Others
There are many functionalities worth going through on reMarkable, such as templates. I am amazed by the completion of reMarkable’s support for PDF, especially the support for the internal links. Many E-ink tablets almost don’t support internal links in PDF documents. Even to support some significant internal links such as tables of contents, they compromise toggle a menu to help users locate the pages instead of jumping during the document reading.
So we can generate templates with reCalendar. This template can help us plan and summarize in a year-month-day dimension. To prevent loading too long, the timespan of the preview below is only two months. You can also tweak the template by adding special dates, modifying the timespan, etc., with reCalendar.
 Loading…
Here is all about reMarkable 2 I learned. I will keep digging and will share more. 😁