Recently I got a Xiaomi Smart Doorbell 3S. This doorbell is quite interesting! It doesn’t support local storage, and all the videos are kept only in Xiaomi Cloud. The problem is that, without a cloud subscription, Xiaomi Cloud only keeps the videos from the last 72 hours and then deletes them.
To save battery, the doorbell stays asleep most of the time. It only wakes up and records in three cases:
- Someone is detected at the door
- Someone presses the doorbell
- Someone tries to forcibly remove the doorbell
So keeping the videos only in the cloud is a fairly good compromise between saving battery and letting users check the videos at any time. If the videos were stored locally, users couldn’t watch them while the doorbell is asleep. And because the doorbell sleeps, it obviously doesn’t provide RTSP or ONVIF for 24/7 continuous recording either. As it happens, Synology Surveillance Station only came with two free camera licenses on my NAS, and both are already used by my two cameras.
Before ordering it, I thought Home Assistant, with its huge community, would already have an integration that keeps the doorbell videos. After it arrived, I found that Xiaomi Miot Auto, the integration I use to manage my Xiaomi Home devices, doesn’t support this at all 😅.
If you want something done, do it yourself. My basic idea was to use Home Assistant and Xiaomi Miot Auto to automatically download and decrypt the cloud videos, then store them on my Synology NAS.
After a bit of research, I found that each time the doorbell wakes up, it records a clip of up to 30 seconds. Each clip is tagged with an event type, such as Pass for someone passing by, Pass:Stay for someone staying at the door, and Pass:Bell for someone pressing the doorbell.
Here is a quick note on the whole process and the issues I ran into along the way.
No Need to Reinvent the Wheel
Why build on Home Assistant and Xiaomi Miot Auto? Because they already handle the Xiaomi account login and token refresh, and the doorbell’s camera entity also shows the time of the latest event (motion_video_time), the event type (motion_video_type), and an m3u8 playback URL (stream_address).
Since the wheel already exists, I didn’t want to reinvent it. Building directly on top of this integration is clearly the most efficient and simplest option. It looks like all I need to do is get stream_address and convert it with ffmpeg, right?
I hoped so.
Four Issues
Issue 1: The m3u8 Is Encrypted
Requesting stream_address returns an HLS playlist — an m3u8 file, which is basically a list that points to several video segments — and every piece is encrypted with AES-128:
#EXTM3U
#EXT-X-VERSION:7
#EXT-X-KEY:METHOD=AES-128,URI="https://sg.app.processor.smartcamera.api.io.mi.com/common/app/play/v1/key?did=<DEVICE_ID>&keyInfo=...",IV=0x<IV>
#EXTINF:3.931311
https://sg.app.processor.smartcamera.api.io.mi.com/common/app/play/v1/video?did=<DEVICE_ID>&stoId=...
#EXT-X-DISCONTINUITY
...
#EXT-X-ENDLISTCode language: PHP (php)
The idea isn’t complicated: fetch the 16-byte key from the URI in #EXT-X-KEY, then use that key and the IV to decrypt each segment with AES-128-CBC. But testing every detail one by one is essentially a very boring process of trial and error.
To be honest, I handed this part over to AI. I used Google Antigravity, let it do the boring trial and error, and just took the results 😂.
Issue 2: A 4-Second Video
After decryption worked, I naturally treated the segments as standard MPEG-TS (.ts) chunks — the usual fragments of one long video — appended all the decrypted bytes into a single file /tmp/test_doorbell.ts, and then remuxed it into an MP4 with ffmpeg:
ffmpeg -y -i /tmp/test_doorbell.ts -c copy /tmp/test_doorbell.mp4Code language: Bash (bash)The same clip is more than 14 seconds long in the Xiaomi Home app, but what I got was only 4 seconds, plus a screen full of Non-monotonous DTS errors 🤦♂️:
[mp4 @ 0x5643e5ef0a00] Non-monotonous DTS in output stream 0:1; previous: 193133, current: 54751; changing to 193134. This may result in incorrect timestamps in the output file.
[mp4 @ 0x5643e5ef0a00] Non-monotonous DTS in output stream 0:1; previous: 193134, current: 55782; changing to 193135. This may result in incorrect timestamps in the output file.
...
frame=  213 fps=0.0 q=-1.0 Lsize=    2649kB time=00:00:04.02 bitrate=5393.4kbits/s speed= 104x
When I printed the first 8 bytes of each decrypted segment, every one of them was 0000002066747970:
Seg 0: enc=826720 dec=826717 magic=0000002066747970
Seg 1: enc=569072 dec=569064 magic=0000002066747970
Seg 2: enc=557232 dec=557222 magic=0000002066747970
Seg 3: enc=497008 dec=497007 magic=0000002066747970
Seg 4: enc=271360 dec=271354 magic=0000002066747970
In short, these segments are MP4 files, not TS. Why? An MP4 file is made of boxes. Each box starts with a 4-byte big-endian size, followed by a 4-byte type written in ASCII:
00 00 00 20: the box size,0x20= 32 bytes.66 74 79 70: the box type in ASCII,0x66=f,0x74=t,0x79=y,0x70=p, so it readsftyp.
ftyp (File Type Box) is normally the very first box of an MP4 file. A TS chunk would start with the sync byte 0x47 instead.
In other words, each roughly three-second segment from Xiaomi is a complete, standalone MP4 file, not the usual TS or fMP4 chunk. Each segment’s timestamps start from zero, so joining them byte by byte is bound to be a mess.
The fix is to save each segment as its own temporary file and losslessly stitch them together with ffmpeg’s concat demuxer. -c copy means ffmpeg copies the video as-is, without converting it again:
ffmpeg -f concat -safe 0 -i concat_list.txt -c copy -movflags +faststart output.mp4Code language: Bash (bash)The result is the full 2K HEVC (H.265) video with no re-encoding, and it’s really fast.
Issue 3: 60-Second Polling Misses Clips
Xiaomi Miot Auto polls every 60 seconds and only picks up the latest event. If someone stays at the door and triggers two clips in a short time, the next Home Assistant poll only sees the second one, and the first one is missed for good.
So besides accepting the URL passed from Home Assistant, the script uses the credentials that Xiaomi Miot Auto stores in .storage/xiaomi_miot/auth-*.json to call Xiaomi Cloud’s event list API (common/app/get/eventlist) directly. It checks the recent events, compares them with the videos already on the NAS, and downloads any that are missing.
Another benefit is that token refresh is handled entirely by Home Assistant and Xiaomi Miot Auto, so the code needs no account information at all.
Issue 4: The Clip Is Still Being Uploaded
The doorbell records up to 30 seconds per event and uploads to the cloud while recording. If you download a clip as soon as the event shows up, you will probably only get the first one or two segments.
The fix is simple and blunt:
- In the automation, wait 35 seconds after
motion_video_timechanges before calling the script. - In the script, check whether the m3u8 contains
#EXT-X-ENDLIST. If not, the clip is still being uploaded, so wait 10 seconds and fetch it again.
Architecture
The whole flow looks roughly like this:
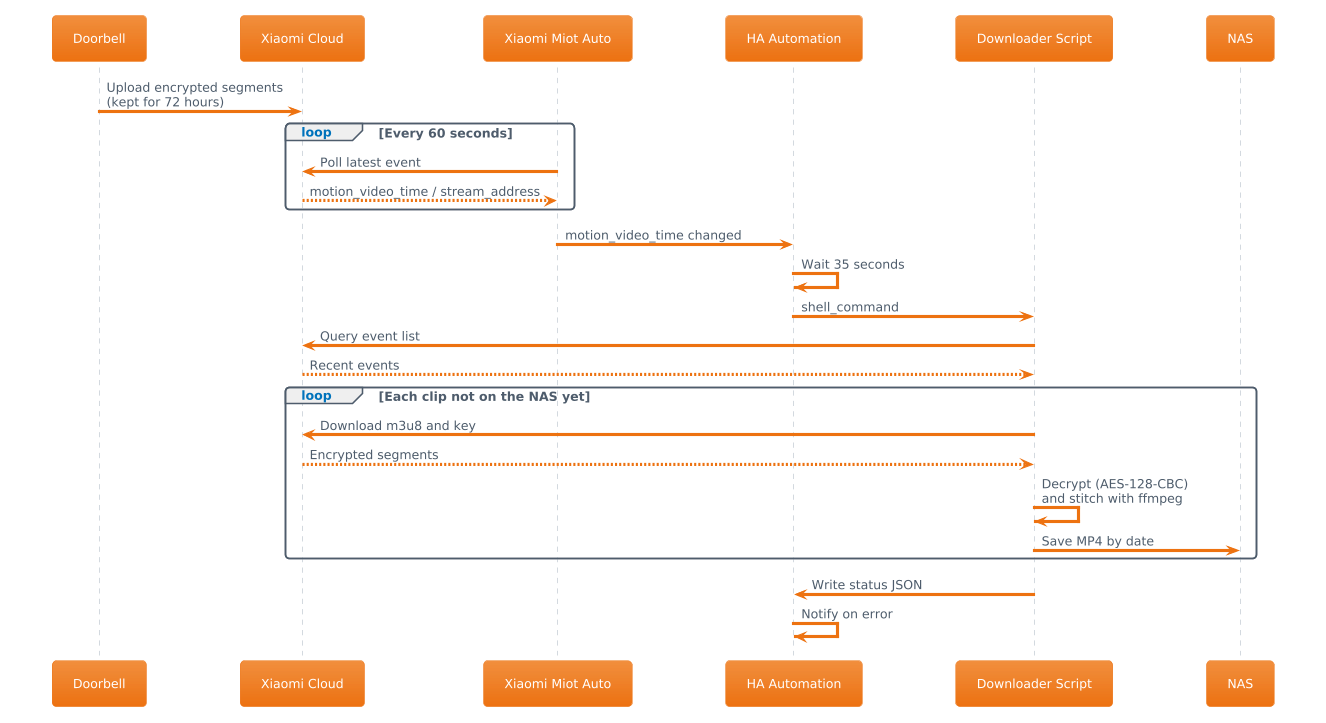
- The doorbell uploads encrypted segments to Xiaomi Cloud (kept for 72 hours).
- Xiaomi Miot Auto polls every 60 seconds and updates the doorbell entity’s attributes.
- When
motion_video_timechanges, a Home Assistant automation waits 35 seconds and calls the downloader script throughshell_command. The script also runs when Home Assistant starts and every 30 minutes as a safety net. - The script reads the latest auth file, queries the event list, downloads the m3u8 and the key, decrypts the segments, and joins them with ffmpeg.
- Videos are saved by date under
/volume1/surveillance/Xiaomi Doorbell 3S/YYYY-MM-DD/with names like2026-10-30_21-20-29_Pass-Stay.mp4. I chose this folder on purpose, because it’s also where Surveillance Station stores the camera footage, so I can check all the videos in one place. - The script writes its status to a JSON file, and a Home Assistant sensor reads it and sends a notification when something goes wrong.
The Downloader Script
The downloader is a Python script that runs on the Python 3.13 bundled with the Synology Home Assistant package. requests, cryptography, and the micloud library used by Xiaomi Miot Auto are all built in, so there’s nothing extra to pip install.
The heart of the script is these few decryption lines: decrypt each segment with AES-128-CBC, then strip the PKCS7 padding:
def decrypt_aes_cbc(data: bytes, key: bytes, iv: bytes) -> bytes:
    """Decrypt AES-128-CBC segment and remove PKCS7 padding."""
    cipher = Cipher(algorithms.AES(key), modes.CBC(iv))
    decryptor = cipher.decryptor()
    raw = decryptor.update(data) + decryptor.finalize()
    try:
        unpadder = padding.PKCS7(128).unpadder()
        return unpadder.update(raw) + unpadder.finalize()
    except ValueError:
        return rawCode language: Python (python)
configuration.yaml
In configuration.yaml, add the allowed directory, two shell_command entries (one for event-triggered downloads and one for scheduled syncs), and a command_line sensor that reads the status JSON:
homeassistant:
  allowlist_external_dirs:
    - "/volume1/surveillance/Xiaomi Doorbell 3S"

shell_command:
  download_doorbell_video: >-
    /var/packages/HomeAssistant/target/bin/python3.13
    /var/packages/HomeAssistant/home/.homeassistant/download_doorbell_video.py
    --url "{{ stream_address }}"
    --time "{{ video_time }}"
    --type "{{ video_type }}"
    --limit 8
  sync_doorbell_cloud: >-
    /var/packages/HomeAssistant/target/bin/python3.13
    /var/packages/HomeAssistant/home/.homeassistant/download_doorbell_video.py
    --limit 15Code language: YAML (yaml)
To keep the post short, I won’t paste the full code here, but here’s a quick note on the parameters used:
--url,--time,--type: the playback URL, time, and event type of the latest event.--limit: how many of the most recent events to fetch from Xiaomi Cloud’s event list and check. Clips already on the NAS are skipped, and only the ones not yet downloaded are downloaded. The event-triggered run uses 8 and the scheduled sync uses 15. Both are kept small so the script finishes within the 60-secondshell_commandtimeout.--backfill: catch-up mode. The script pages backward through the event list,--limitevents per page, and checks every clip still kept in Xiaomi Cloud. It takes a while, so I recommend running it by hand rather than from an automation.
automations.yaml
The automation has three triggers: an event update, Home Assistant startup, and every 30 minutes. The event branch waits 35 seconds first:
triggers:
  - id: motion_event
    trigger: state
    entity_id: camera.madv_mi3sg_xxxx_video_doorbell
    attribute: motion_video_time
  - id: ha_startup
    trigger: homeassistant
    event: start
  - id: periodic_catchup
    trigger: time_pattern
    minutes: "/30"Code language: YAML (yaml)
There’s also a second automation that has Home Assistant send a notification when the status sensor turns to ERROR. I won’t go into detail here.
Backfilling Existing Cloud Clips
Once everything is configured, run the script once by hand with --backfill to pull all the clips from the last 72 hours in Xiaomi Cloud. The logs look roughly like this:
[INFO] Downloading cloud event: time=2026-10-30 21:20:29 type=Pass:Stay fileId=...
[INFO] Saved /volume1/surveillance/Xiaomi Doorbell 3S/2026-10-30/2026-10-30_21-20-29_Pass-Stay.mp4 (2655.5 KB, 5 segments)
Lessons Learned
- Don’t assume the segments in an m3u8 are TS. Check the first 8 bytes of a decrypted segment. Once you see
ftyp, the problem is obvious. - Home Assistant’s
shell_commandhas a 60-second timeout. For automatic runs, keep--limit(the number of events checked per run) small; for big catch-ups, run--backfillby hand. - Xiaomi Cloud stalls now and then. Adding retries to every HTTP request saves you from a lot of random failures.
- File permissions on Synology. Manual tests over SSH run as your own admin account, while Home Assistant runs as the
HomeAssistantuser, so when you hand the code over to Home Assistant and something goes wrong, check the permissions on the log, the status file, and the folders first.
Now every time the doorbell is triggered, the video lands on my NAS automatically, and I no longer worry about it disappearing after 72 hours. Not many people come and go at my door, and 30-second clips are small, so I didn’t set any maximum retention period in the script.
That’s all for now.